mybatis 的入门
特别提示: mybatis 官方教程:https://mybatis.org/mybatis-3/zh/index.html )
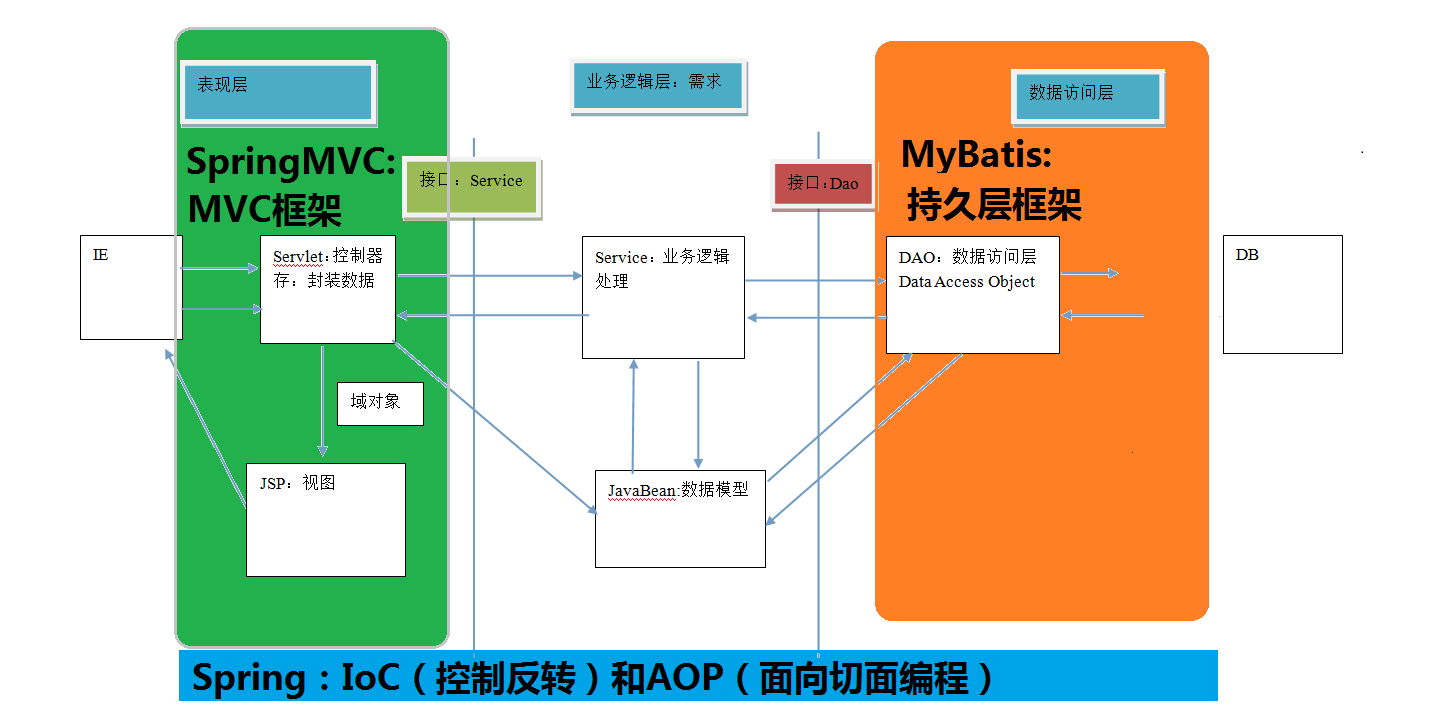
既然要学习框架,那就要知道 什么是框架 框架 是我们软件开发中的 一套解决方案 使用框架的好处 大大提高开发效率
mybatis 的概述 mybatis 是一个优秀的基于 java 的持久层框架,它内部封装了 jdbc,使开发者 只需要关注 sql 语句本身
它通过 xml 或 注解 的方式将要执行的各种 statement 配置起来,并通过 java 对象和 statement 中 sql 的动态参数进行映射生成最终执行的 sql 语句,最后由 mybatis 框架执行 sql 并将结果映射为 java 对象并返回
该框架采用 ORM 思想 解决了 实体和数据库映射的问题 ORM 。 ORM 是 Object Relational Mappging 对象关系映射 把数据库表和实体类及实体类的属性对应起来
mybatis 属于持久层框架
mybatis 的环境搭建 第一步: 先创建一个数据库 数据表 复制代码执行即可
1
2
3
4
5
6
7
8
9
10
11
12
13
14
15
16
17
18
19
20
21
22
23
24
25
26
27
28
29
30
31
32
33
34
35
36
37
38
39
40
41
42
43
44
45
46
47
48
49
50
51
DROP TABLE IF EXISTS `user` ;CREATE TABLE `user` ( `id` int (11 ) NOT NULL auto_increment, `username` varchar (32 ) NOT NULL COMMENT '用户名称' , `birthday` datetime default NULL COMMENT '生日' , `sex` char (1 ) default NULL COMMENT '性别' , `address` varchar (256 ) default NULL COMMENT '地址' , PRIMARY KEY (`id` ) ) ENGINE =InnoDB DEFAULT CHARSET =utf8; insert into `user` (`id` ,`username` ,`birthday` ,`sex` ,`address` ) values (41 ,'老王' ,'2018-02-27 17:47:08' ,'男' ,'北京' ),(42 ,'小二王' ,'2018-03-02 15:09:37' ,'女' ,'北京金燕龙' ),(43 ,'小二王' ,'2018-03-04 11:34:34' ,'女' ,'北京金燕龙' ),(45 ,'传智播客' ,'2018-03-04 12:04:06' ,'男' ,'北京金燕龙' ),(46 ,'老王' ,'2018-03-07 17:37:26' ,'男' ,'北京' ),(48 ,'小马宝莉' ,'2018-03-08 11:44:00' ,'女' ,'北京修正' );DROP TABLE IF EXISTS `account` ;CREATE TABLE `account` ( `ID` int (11 ) NOT NULL COMMENT '编号' , `UID` int (11 ) default NULL COMMENT '用户编号' , `MONEY` double default NULL COMMENT '金额' , PRIMARY KEY (`ID` ), KEY `FK_Reference_8` (`UID` ), CONSTRAINT `FK_Reference_8` FOREIGN KEY (`UID` ) REFERENCES `user` (`id` ) ) ENGINE =InnoDB DEFAULT CHARSET =utf8; insert into `account` (`ID` ,`UID` ,`MONEY` ) values (1 ,41 ,1000 ),(2 ,45 ,1000 ),(3 ,41 ,2000 );DROP TABLE IF EXISTS `role` ;CREATE TABLE `role` ( `ID` int (11 ) NOT NULL COMMENT '编号' , `ROLE_NAME` varchar (30 ) default NULL COMMENT '角色名称' , `ROLE_DESC` varchar (60 ) default NULL COMMENT '角色描述' , PRIMARY KEY (`ID` ) ) ENGINE =InnoDB DEFAULT CHARSET =utf8; insert into `role` (`ID` ,`ROLE_NAME` ,`ROLE_DESC` ) values (1 ,'院长' ,'管理整个学院' ),(2 ,'总裁' ,'管理整个公司' ),(3 ,'校长' ,'管理整个学校' );DROP TABLE IF EXISTS `user_role` ;CREATE TABLE `user_role` ( `UID` int (11 ) NOT NULL COMMENT '用户编号' , `RID` int (11 ) NOT NULL COMMENT '角色编号' , PRIMARY KEY (`UID` ,`RID` ), KEY `FK_Reference_10` (`RID` ), CONSTRAINT `FK_Reference_10` FOREIGN KEY (`RID` ) REFERENCES `role` (`ID` ), CONSTRAINT `FK_Reference_9` FOREIGN KEY (`UID` ) REFERENCES `user` (`id` ) ) ENGINE =InnoDB DEFAULT CHARSET =utf8; insert into `user_role` (`UID` ,`RID` ) values (41 ,1 ),(45 ,1 ),(41 ,2 );
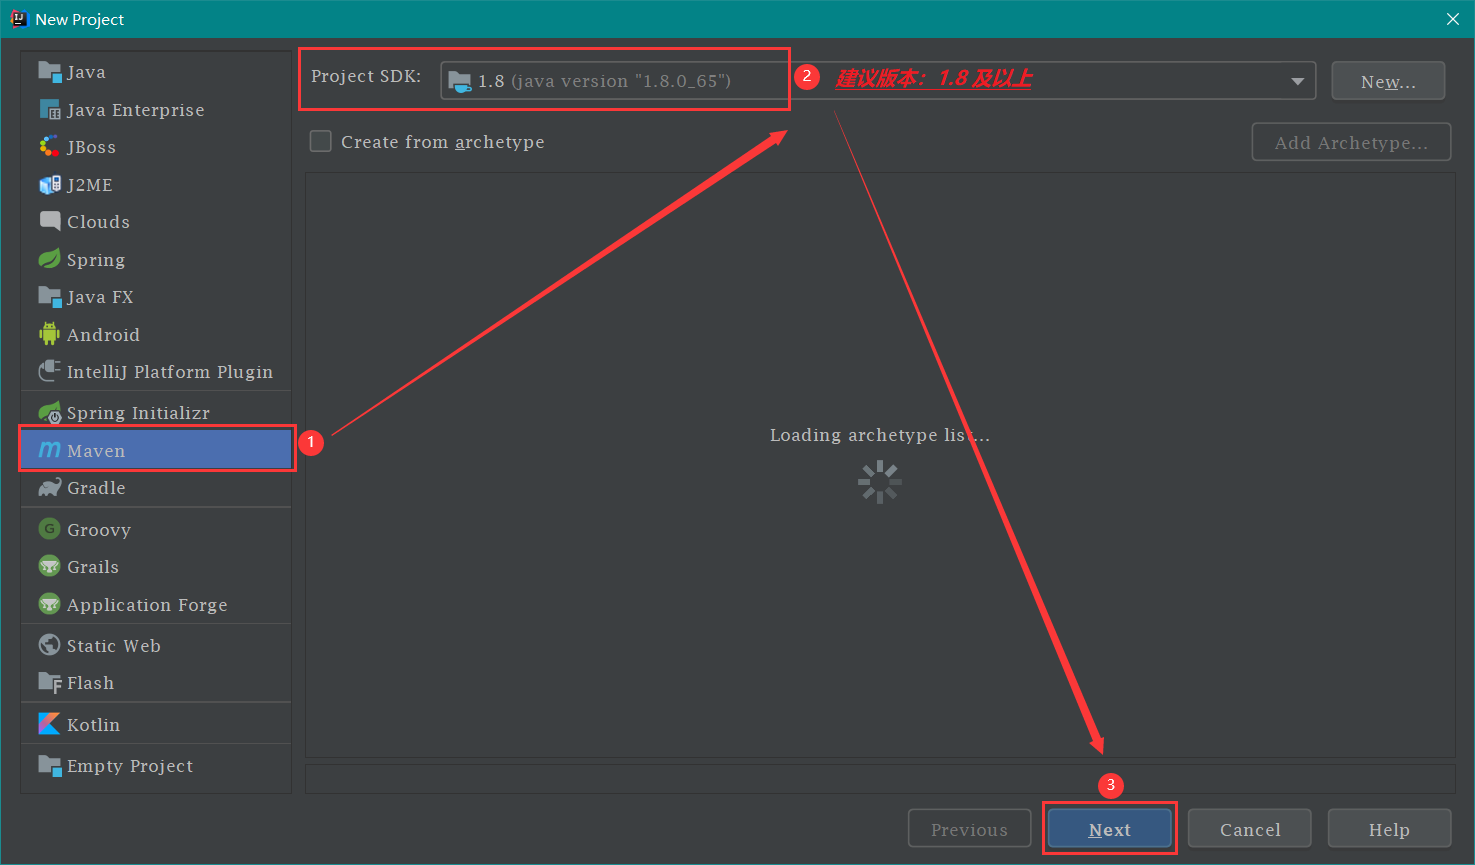
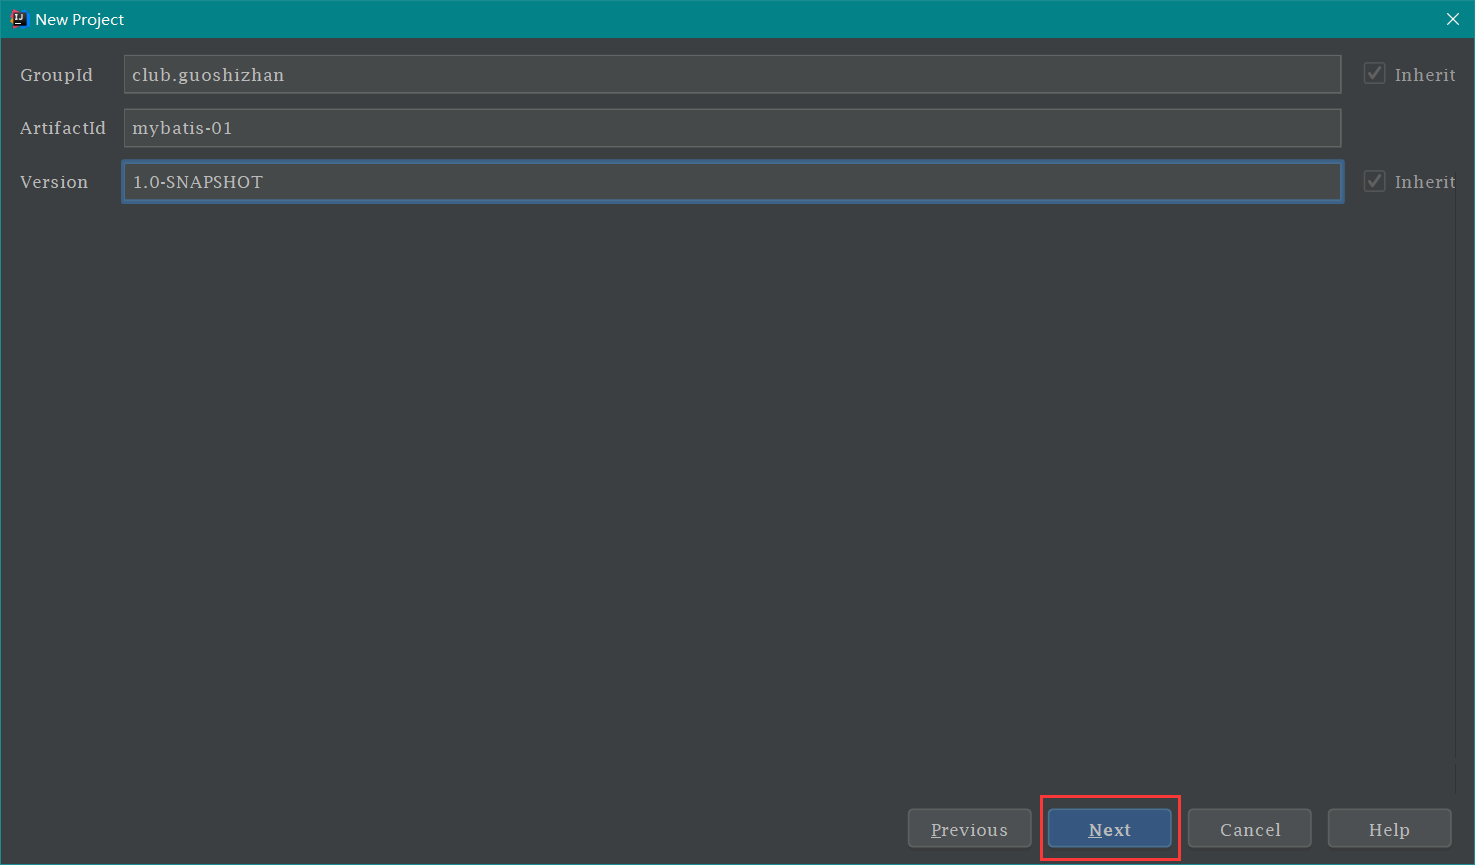
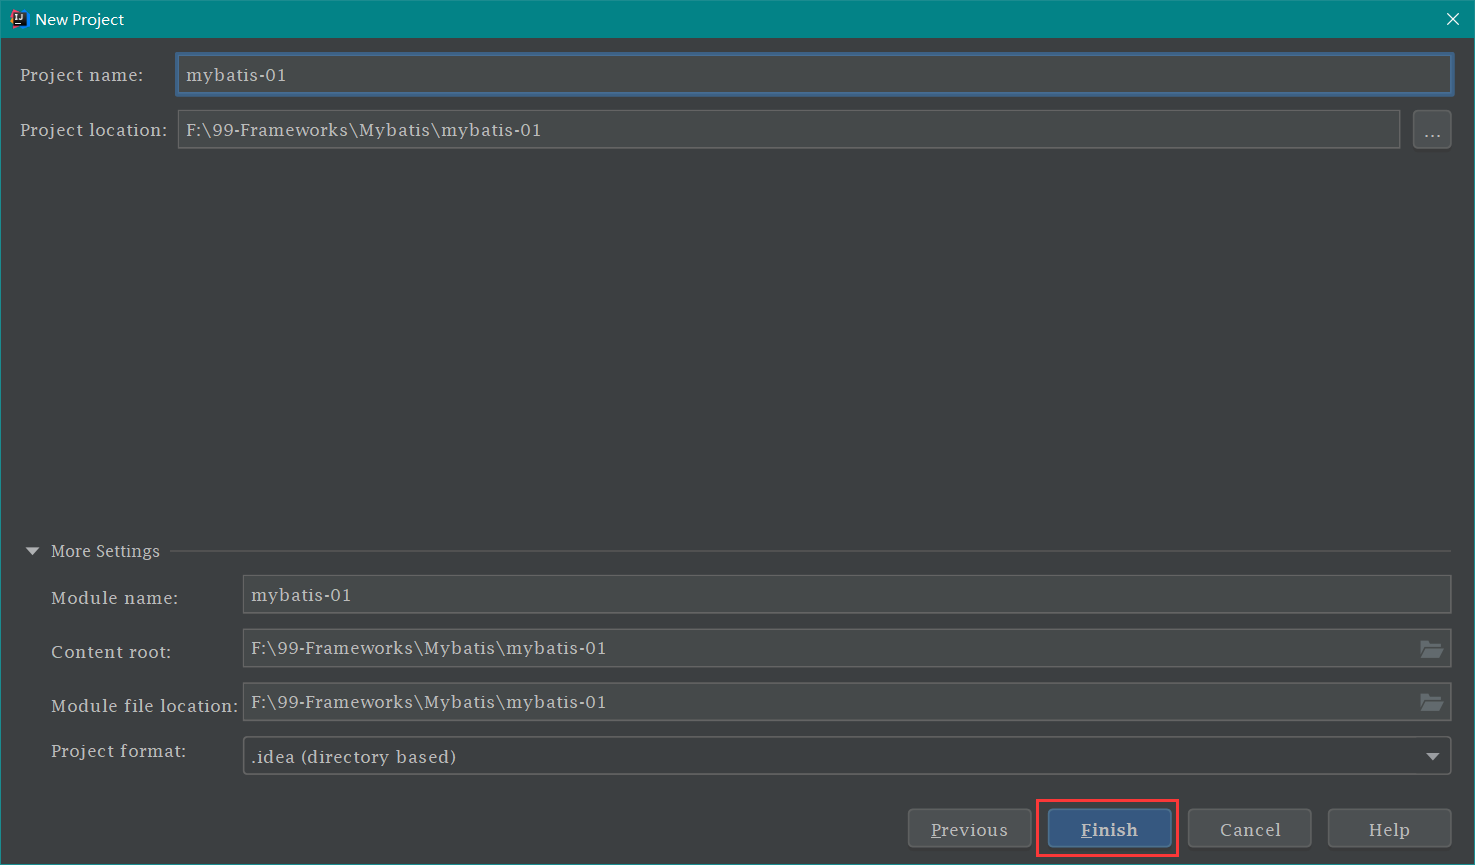
第二步: 创建一个 maven 工程
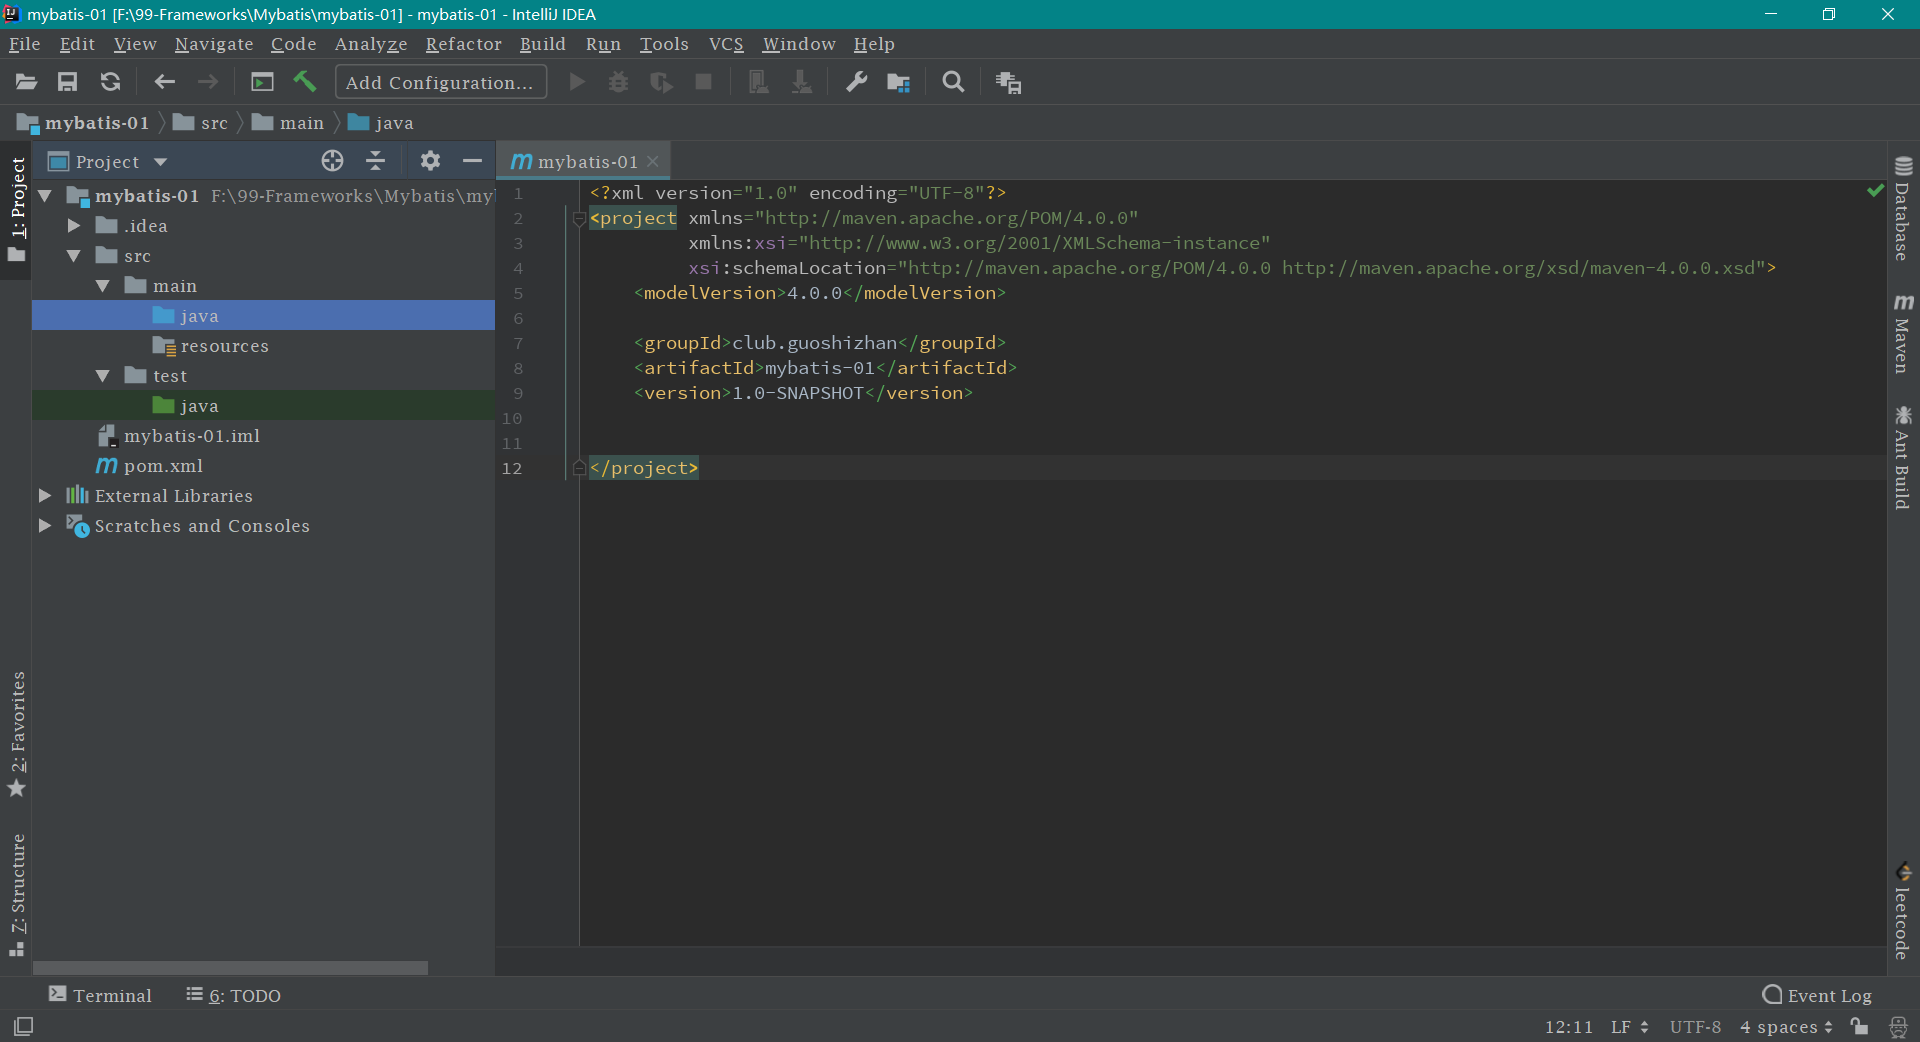
第三步: 导入相关依赖 pom.xml 文件,把以下 代码中的 <dependencies> 依赖部分 打包方式顺便加上
1
2
3
4
5
6
7
8
9
10
11
12
13
14
15
16
17
18
19
20
21
22
23
24
25
26
27
28
29
30
31
32
33
34
35
36
37
38
39
40
41
42
43
44
45
<?xml version="1.0" encoding="UTF-8"?> <project xmlns ="http://maven.apache.org/POM/4.0.0" xmlns:xsi ="http://www.w3.org/2001/XMLSchema-instance" xsi:schemaLocation ="http://maven.apache.org/POM/4.0.0 http://maven.apache.org/xsd/maven-4.0.0.xsd" > <modelVersion > 4.0.0</modelVersion > <groupId > club.guoshizhan</groupId > <artifactId > mybatis-01</artifactId > <version > 1.0-SNAPSHOT</version > <packaging > jar</packaging > <dependencies > <dependency > <groupId > org.mybatis</groupId > <artifactId > mybatis</artifactId > <version > 3.4.5</version > </dependency > <dependency > <groupId > mysql</groupId > <artifactId > mysql-connector-java</artifactId > <version > 5.1.6</version > <scope > runtime</scope > </dependency > <dependency > <groupId > log4j</groupId > <artifactId > log4j</artifactId > <version > 1.2.12</version > </dependency > <dependency > <groupId > junit</groupId > <artifactId > junit</artifactId > <version > 4.10</version > <scope > test</scope > </dependency > </dependencies > </project >
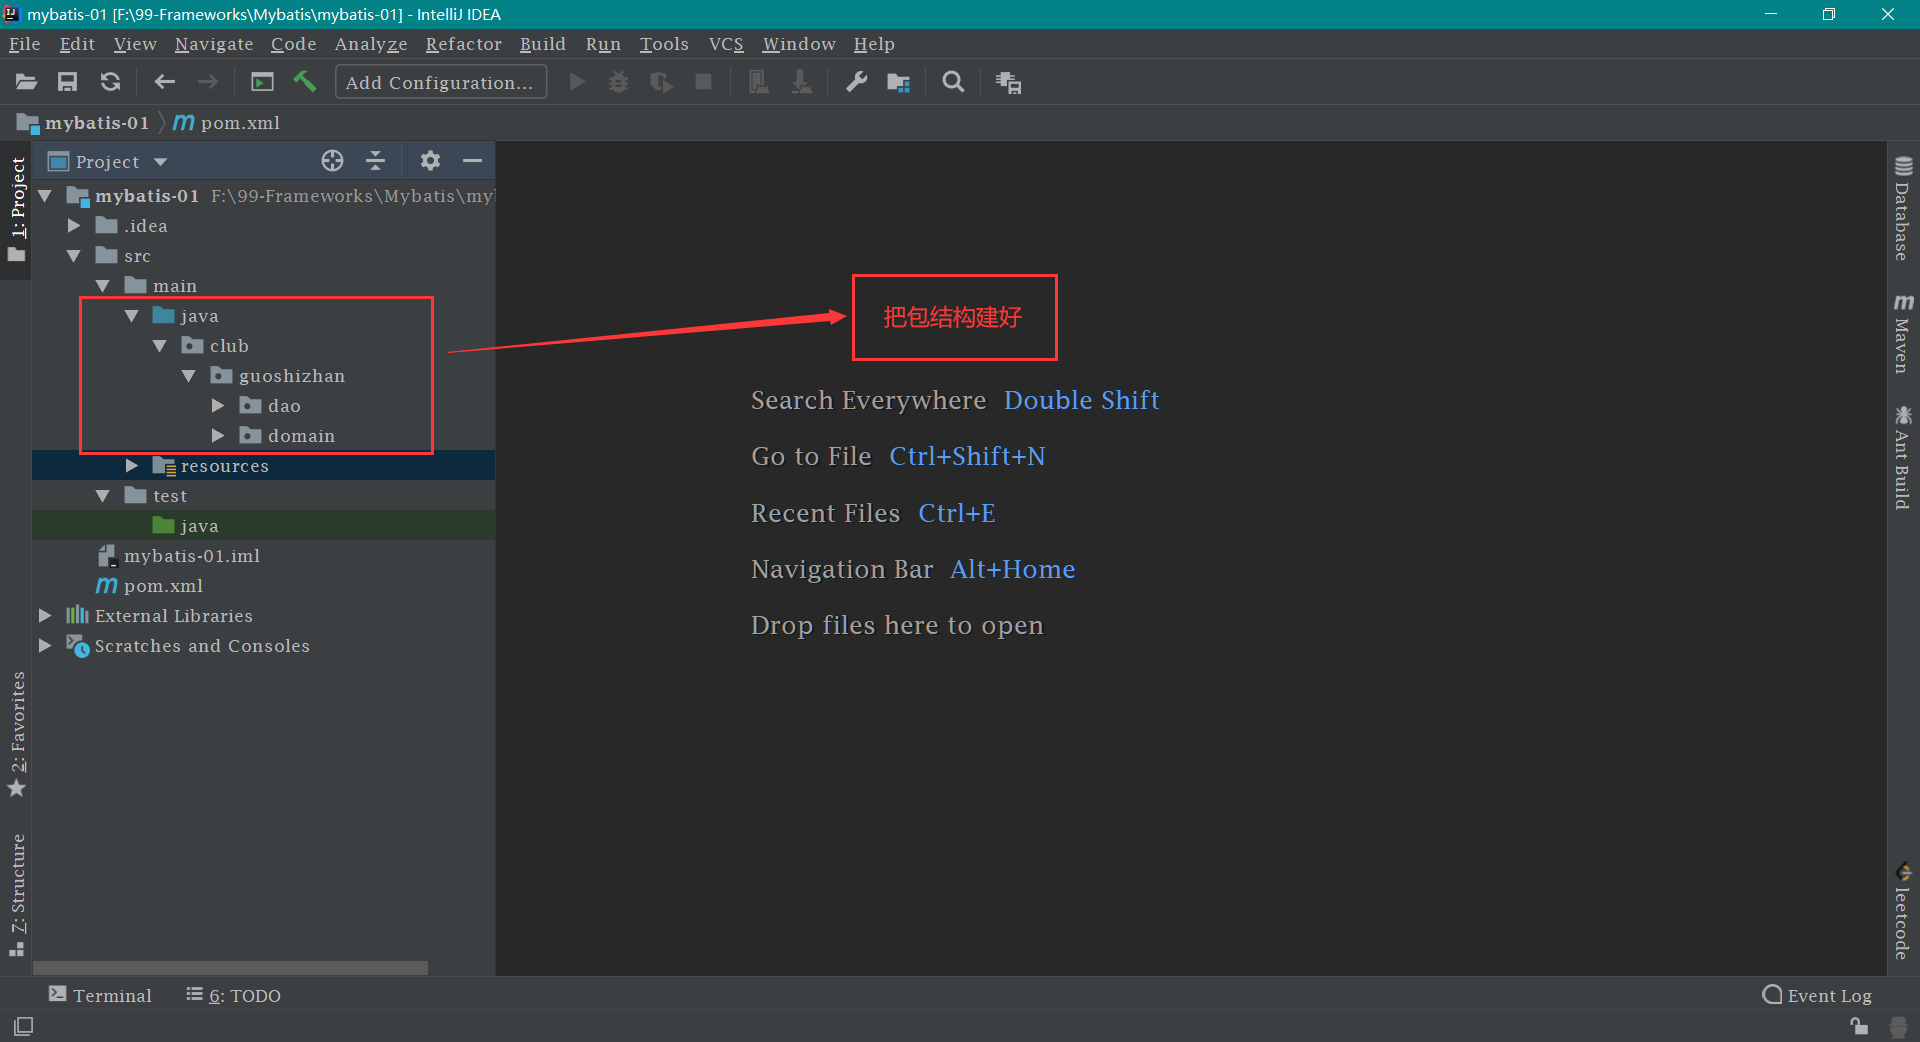
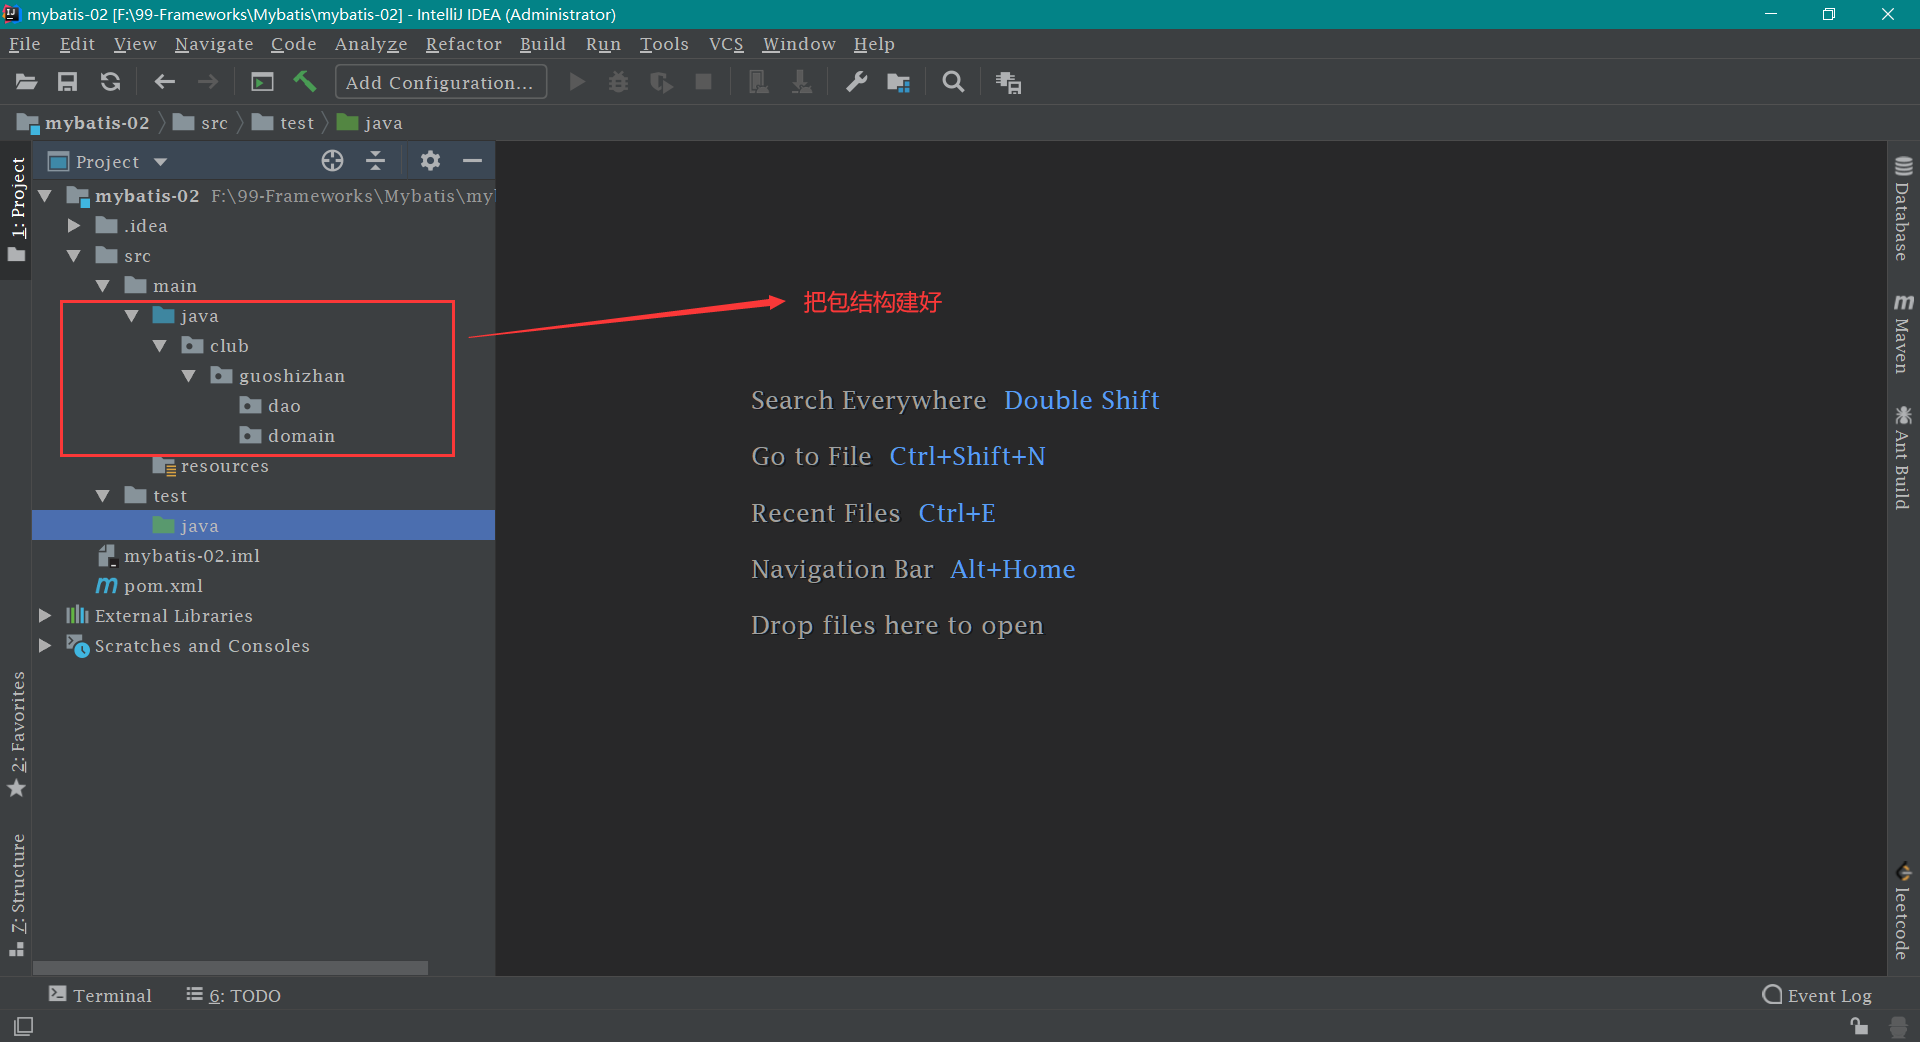
第四步: 建立包结构
第五步: 在 club/guoshizhan/domain 包下新建 User 类 ,和数据库中的 user 表 相映射。代码如下:
1
2
3
4
5
6
7
8
9
10
11
12
13
14
15
16
17
18
19
20
21
22
23
24
25
26
27
28
29
30
31
32
33
34
35
36
37
38
39
40
41
42
43
44
45
46
47
48
49
50
51
52
53
54
55
56
57
58
59
60
61
62
63
64
65
66
67
68
package club.guoshizhan.domain;import java.io.Serializable;import java.util.Date;public class User implements Serializable private Integer id; private String username; private Date birthday; private String sex; private String address; @Override public String toString () return "User{" + "id=" + id + ", username='" + username + '\'' + ", birthday=" + birthday + ", sex='" + sex + '\'' + ", address='" + address + '\'' + '}' ; } public Integer getId () return id; } public void setId (Integer id) this .id = id; } public String getUsername () return username; } public void setUsername (String username) this .username = username; } public Date getBirthday () return birthday; } public void setBirthday (Date birthday) this .birthday = birthday; } public String getSex () return sex; } public void setSex (String sex) this .sex = sex; } public String getAddress () return address; } public void setAddress (String address) this .address = address; } }
第六步: 在 club/guoshizhan/dao 包下新建 IUserDao 接口 ,然后定义方法,用于对 user 表 的增删改查。代码如下:
1
2
3
4
5
6
7
8
9
10
11
12
13
14
15
16
17
package club.guoshizhan.dao;import club.guoshizhan.domain.User;import java.util.List;public interface IUserDao List<User> findAll () ; }
第七步: 在 resources 目录 下新建 SqlMapConfig.xml 文件【文件名随意取,不一定是 SqlMapConfig】。这是 mybatis 的主配置文件,各种配置都写好了对应的注释
1
2
3
4
5
6
7
8
9
10
11
12
13
14
15
16
17
18
19
20
21
22
23
24
25
26
27
28
29
30
31
32
33
34
<?xml version="1.0" encoding="UTF-8"?> <!DOCTYPE configuration PUBLIC "-//mybatis.org//DTD Config 3.0//EN" "http://mybatis.org/dtd/mybatis-3-config.dtd" > <configuration > <environments default ="mysql" > <environment id ="mysql" > <transactionManager type ="JDBC" > </transactionManager > <dataSource type ="POOLED" > <property name ="driver" value ="com.mysql.jdbc.Driver" /> <property name ="url" value ="jdbc:mysql://localhost:3306/eesy_mybatis" /> <property name ="username" value ="root" /> <property name ="password" value ="root" /> </dataSource > </environment > </environments > <mappers > <mapper resource ="club/guoshizhan/dao/IUserDao.xml" /> </mappers > </configuration >
第八步: 编写 IUserDao.xml 文件 resources 目录下新建 club 目录,然后在 club 目录下新建 guoshizhan 目录,最后在 guoshizhan 目录下 新建 dao 目录。然后在 dao目录下新建 IUserDao.xml 文件
IUserDao.xml 1 2 3 4 5 6 7 8 9 10 11 12 13 14 15 <?xml version="1.0" encoding="UTF-8"?> <!DOCTYPE mapper PUBLIC "-//mybatis.org//DTD Mapper 3.0//EN" "http://mybatis.org/dtd/mybatis-3-mapper.dtd" > <mapper namespace ="club.guoshizhan.dao.IUserDao" > <select id ="findAll" resultType ="club.guoshizhan.domain.User" > select * from user; </select > </mapper >
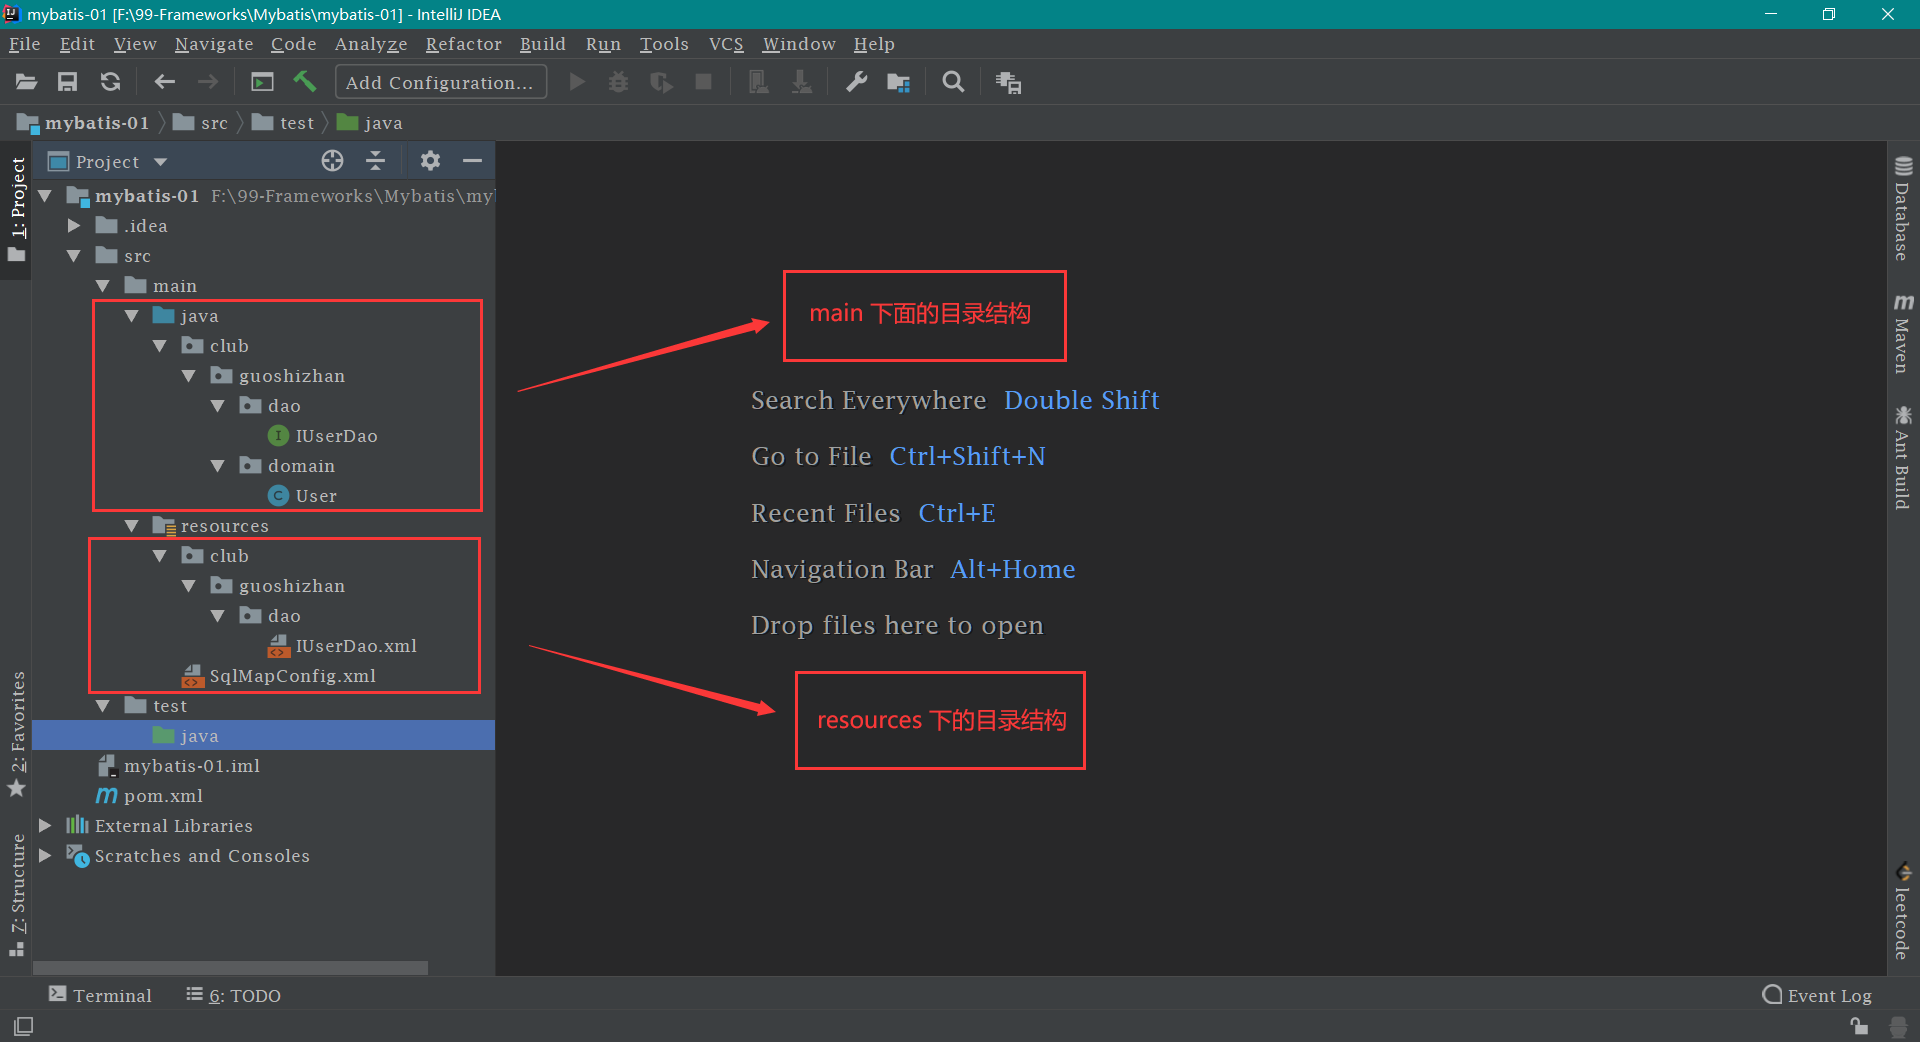
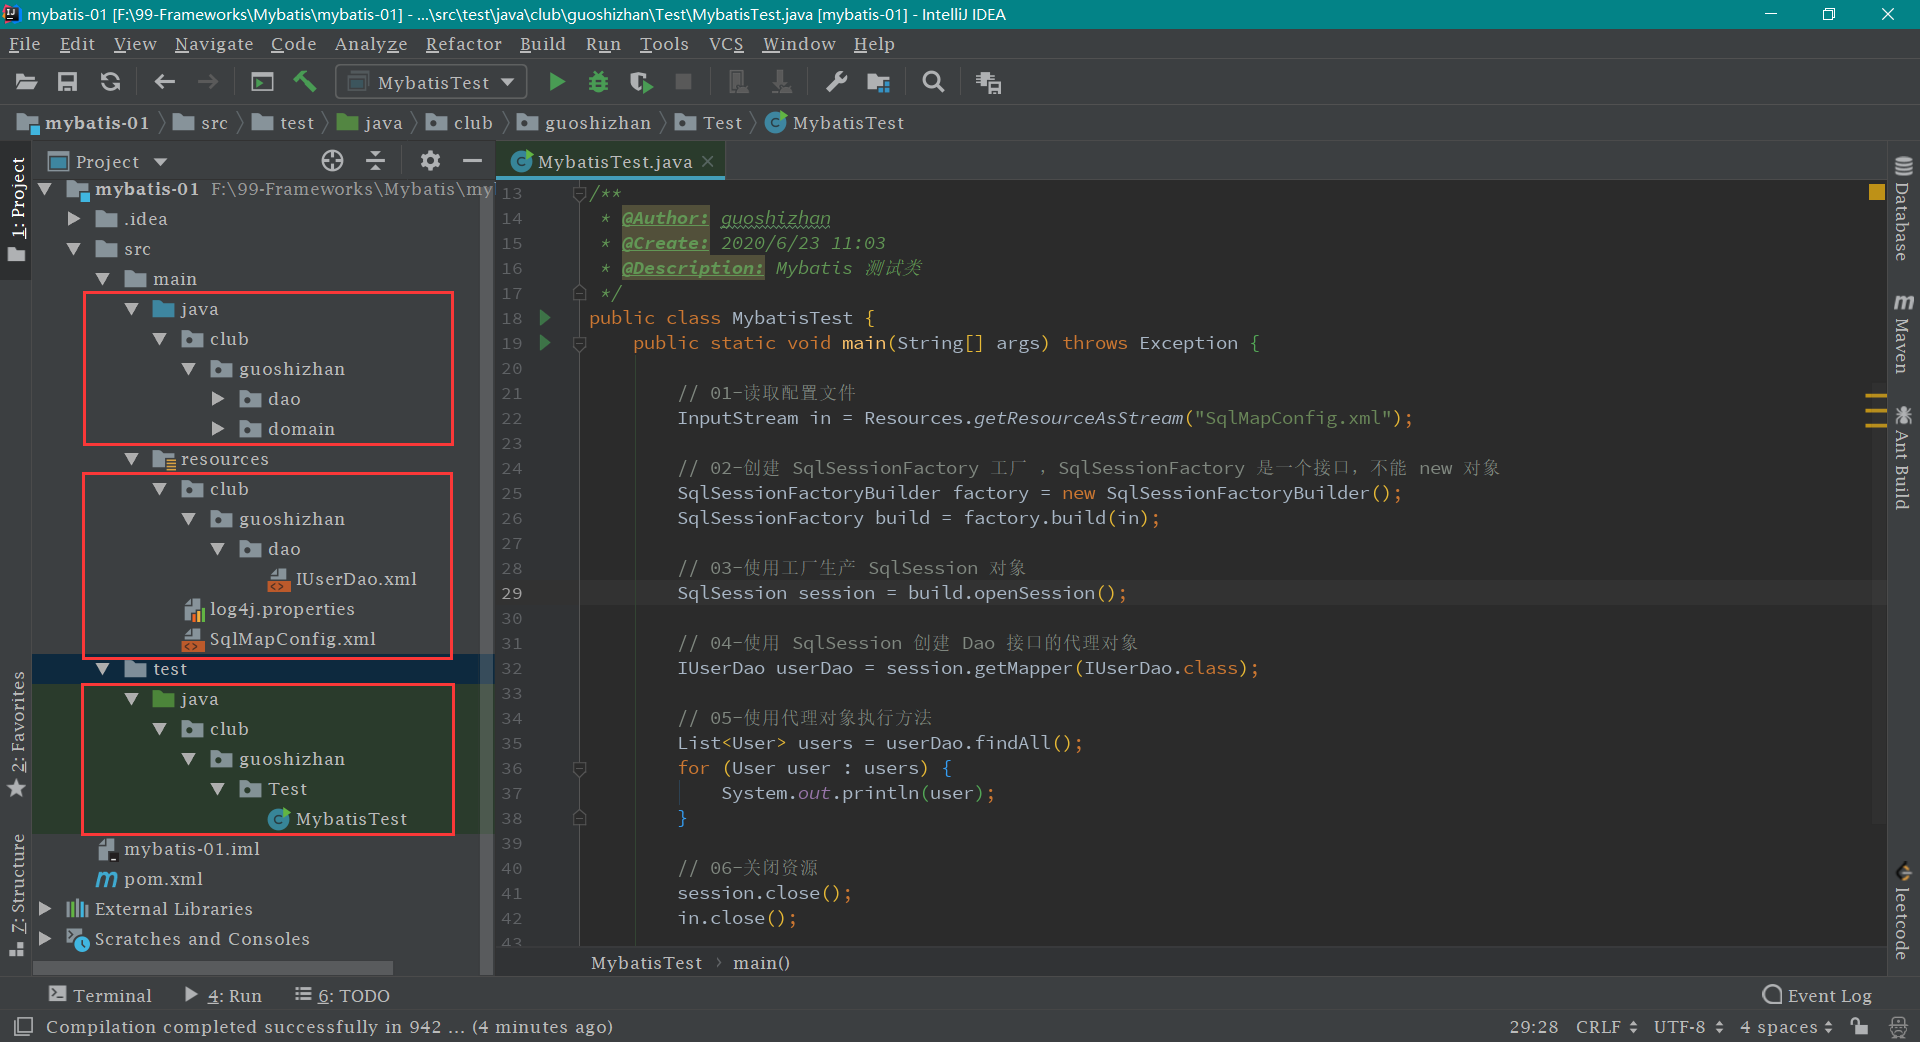
mybatis 环境搭建到此结束,搭建好之后的目录结构
mybatis 环境搭建的注意事项:
1、在 Mybatis 中,持久层的操作接口名称和映射文件也叫做 Mapper 。所以 IUserDao 和 IUserMapper 是一样的。建议使用 IUserMapper 。
2、在 IDEA 中创建目录的时候,它和包的创建是不一样的。包在创建时: club.guoshizhan.dao 是三级结构,目录在创建时: club.guoshizhan.dao 是一级目录。
3、mybatis 的映射配置文件 IUserDao.xml 的位置必须和 dao 接口的包结构相同。
4、映射配置文件的 mapper 标签 namespace 属性的取值必须是 dao 接口的全限定类名。
5、映射配置文件的操作配置(select),id 属性的取值必须是 dao 接口的方法名。
6、当遵从了第三,四,五点之后,我们在开发中就无须再写 dao 的实现类,即简化了开发。
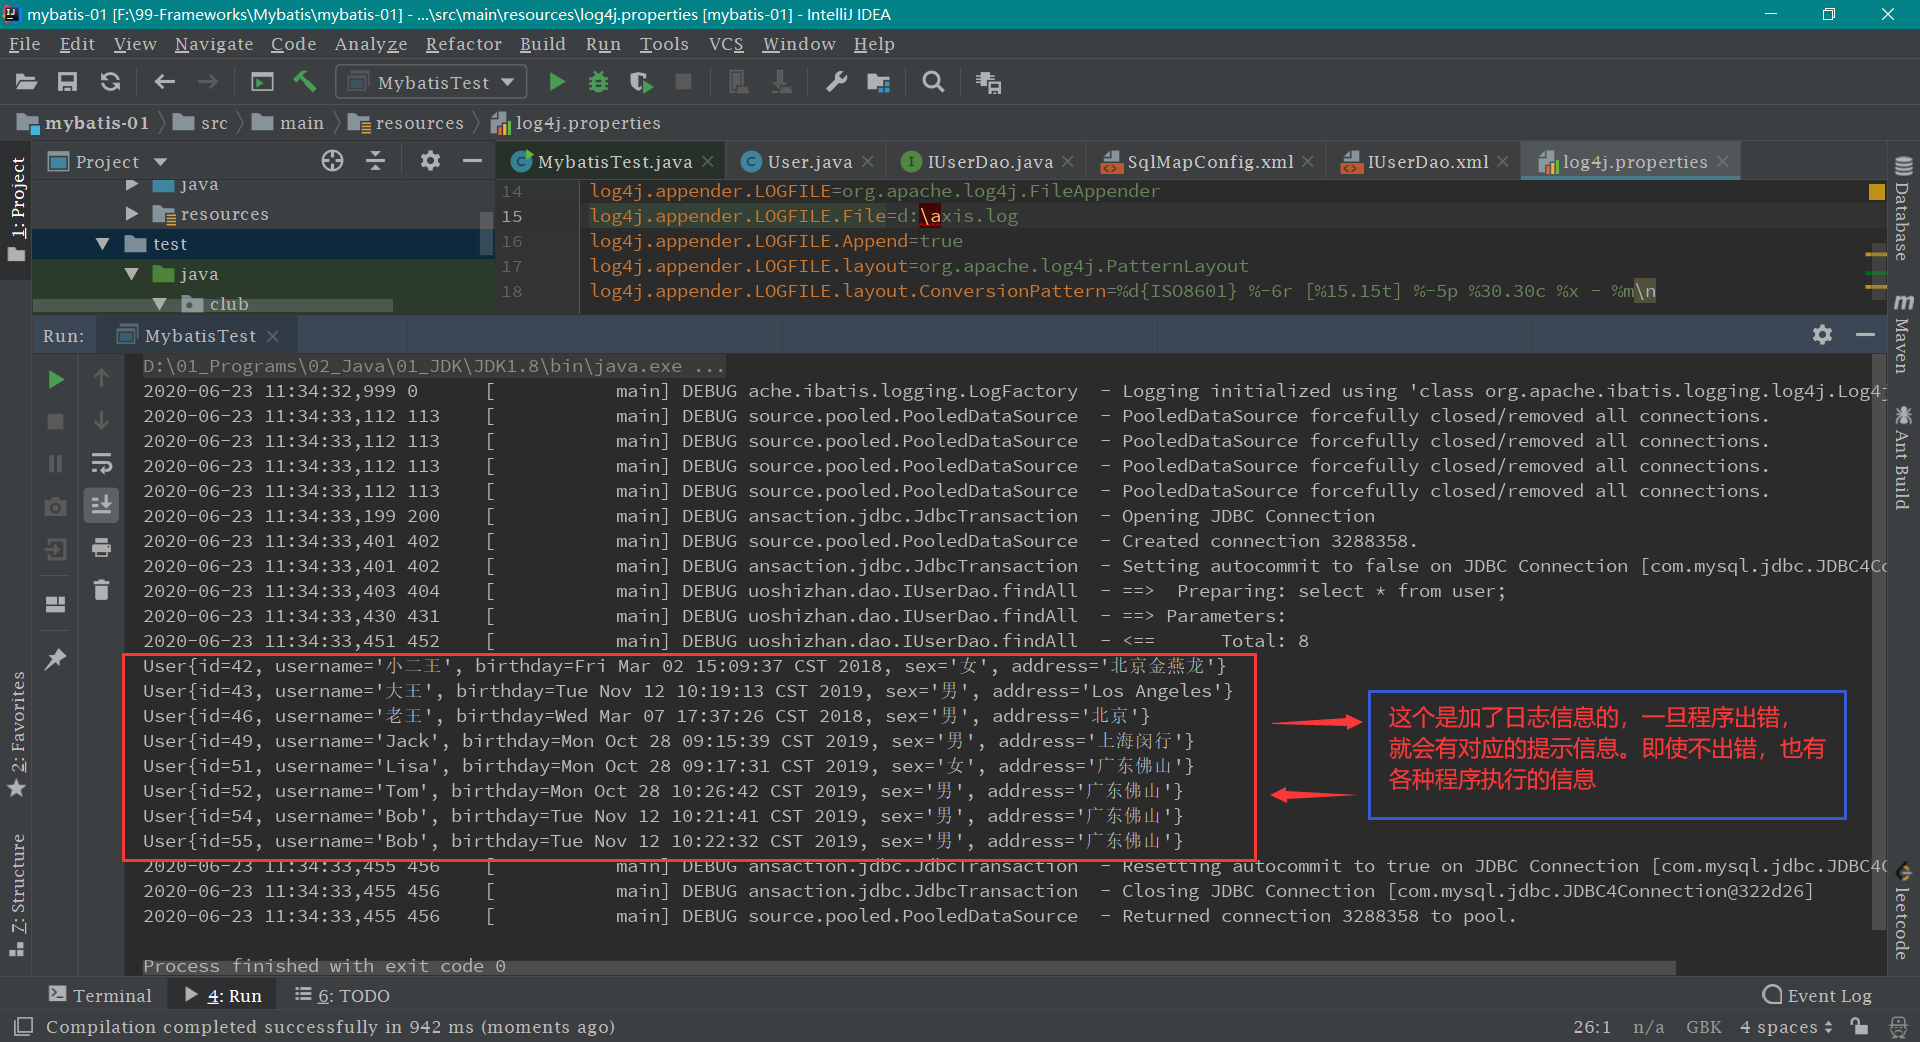
mybatis 的入门案例 第一步: 在 resources 目录下 新建 log4j.properties 日志文件
log4j.properties 1 2 3 4 5 6 7 8 9 10 11 12 13 14 15 16 17 18 log4j.rootCategory =debug, CONSOLE, LOGFILE log4j.logger.org.apache.axis.enterprise =FATAL, CONSOLE log4j.appender.CONSOLE =org.apache.log4j.ConsoleAppender log4j.appender.CONSOLE.layout =org.apache.log4j.PatternLayout log4j.appender.CONSOLE.layout.ConversionPattern =%d{ISO8601} %-6r [%15.15t] %-5p %30.30c %x - %m\n log4j.appender.LOGFILE =org.apache.log4j.FileAppender log4j.appender.LOGFILE.File =d:\axis.log log4j.appender.LOGFILE.Append =true log4j.appender.LOGFILE.layout =org.apache.log4j.PatternLayout log4j.appender.LOGFILE.layout.ConversionPattern =%d{ISO8601} %-6r [%15.15t] %-5p %30.30c %x - %m\n
第二步: 在 test/java 目录下 新建 club.guoshizhan.Test.MybatisTest 类,这样写的目的就是让 IDEA 自动生成三级包结构。然后编写 MybatisTest 类 ,代码如下:
MybatisTest.java 1 2 3 4 5 6 7 8 9 10 11 12 13 14 15 16 17 18 19 20 21 22 23 24 25 26 27 28 29 30 31 32 33 34 35 36 37 38 39 40 41 42 43 44 45 package club.guoshizhan.Test;import club.guoshizhan.dao.IUserDao;import club.guoshizhan.domain.User;import org.apache.ibatis.io.Resources;import org.apache.ibatis.session.SqlSession;import org.apache.ibatis.session.SqlSessionFactory;import org.apache.ibatis.session.SqlSessionFactoryBuilder;import java.io.InputStream;import java.util.List;public class MybatisTest public static void main (String[] args) throws Exception InputStream in = Resources.getResourceAsStream("SqlMapConfig.xml" ); SqlSessionFactoryBuilder factory = new SqlSessionFactoryBuilder(); SqlSessionFactory build = factory.build(in); SqlSession session = build.openSession(); IUserDao userDao = session.getMapper(IUserDao.class ) ; List<User> users = userDao.findAll(); for (User user : users) { System.out.println(user); } session.close(); in.close(); } }
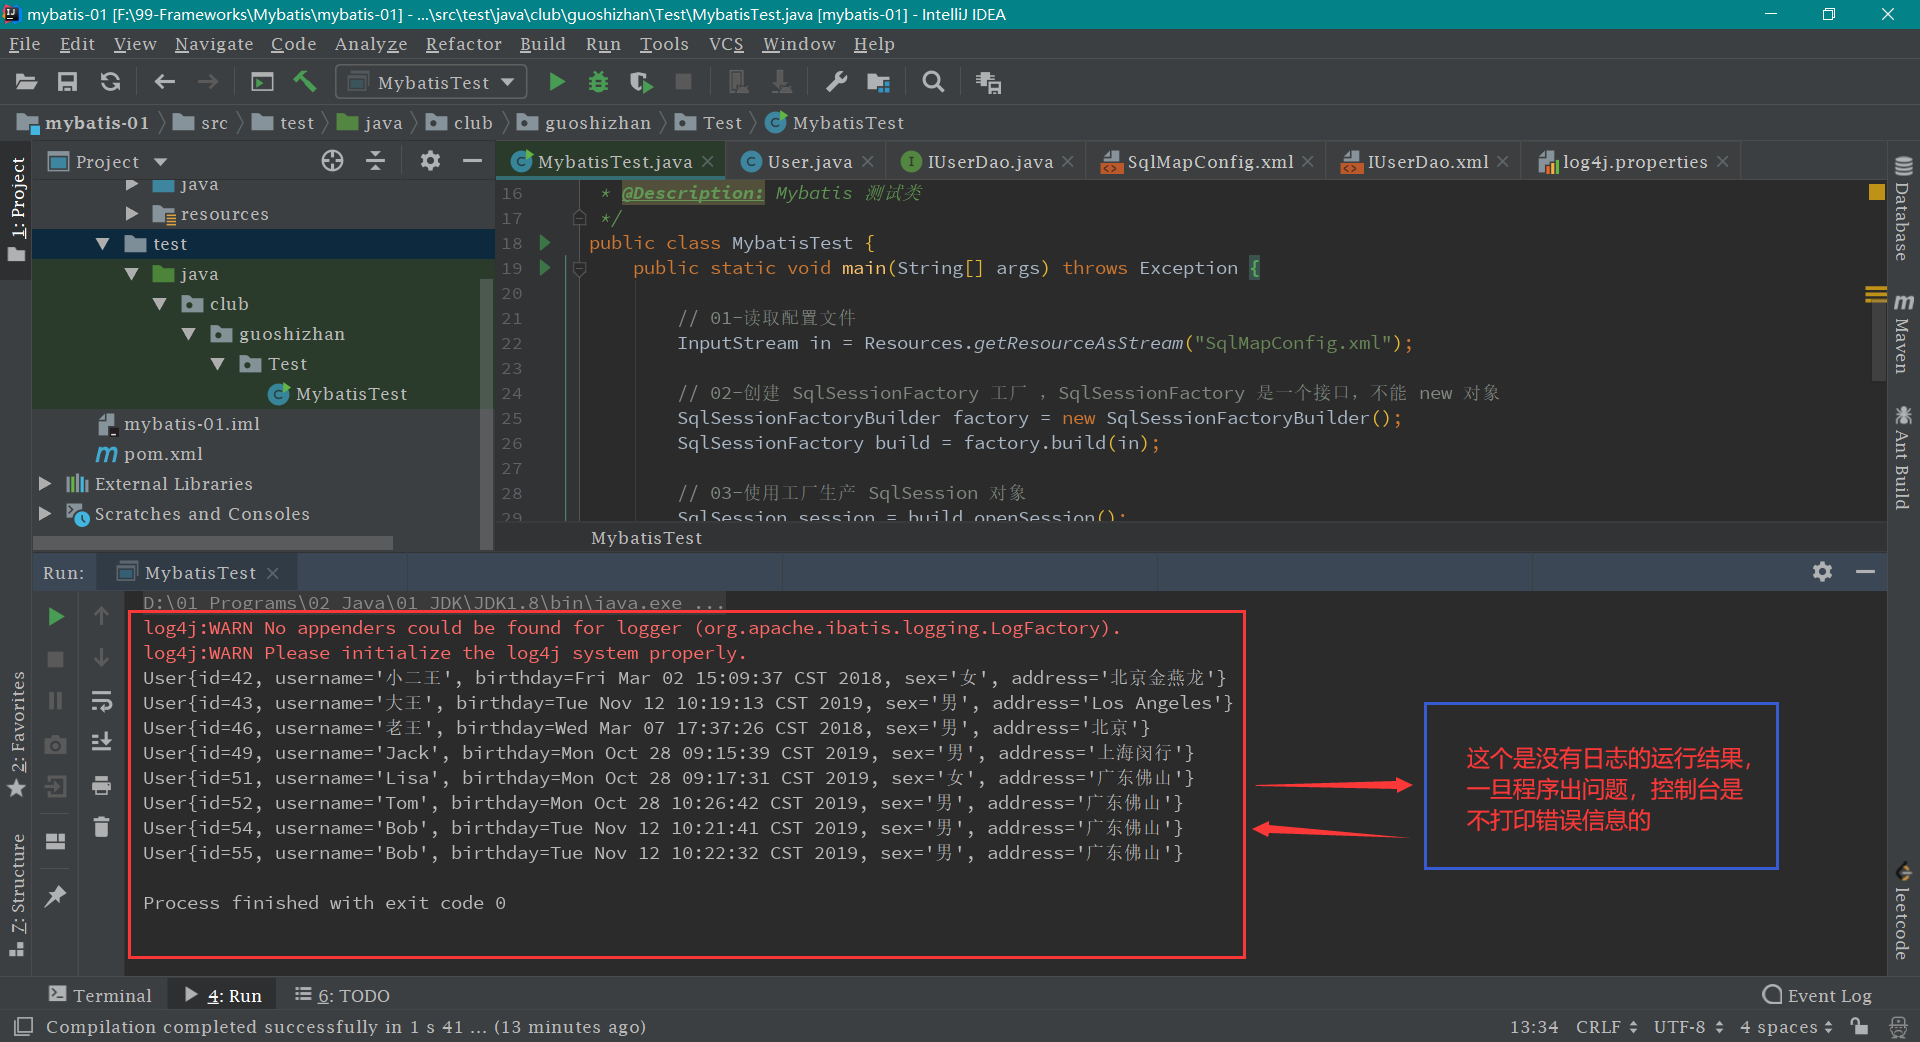
第三步: 运行 main 方法,结果如下:
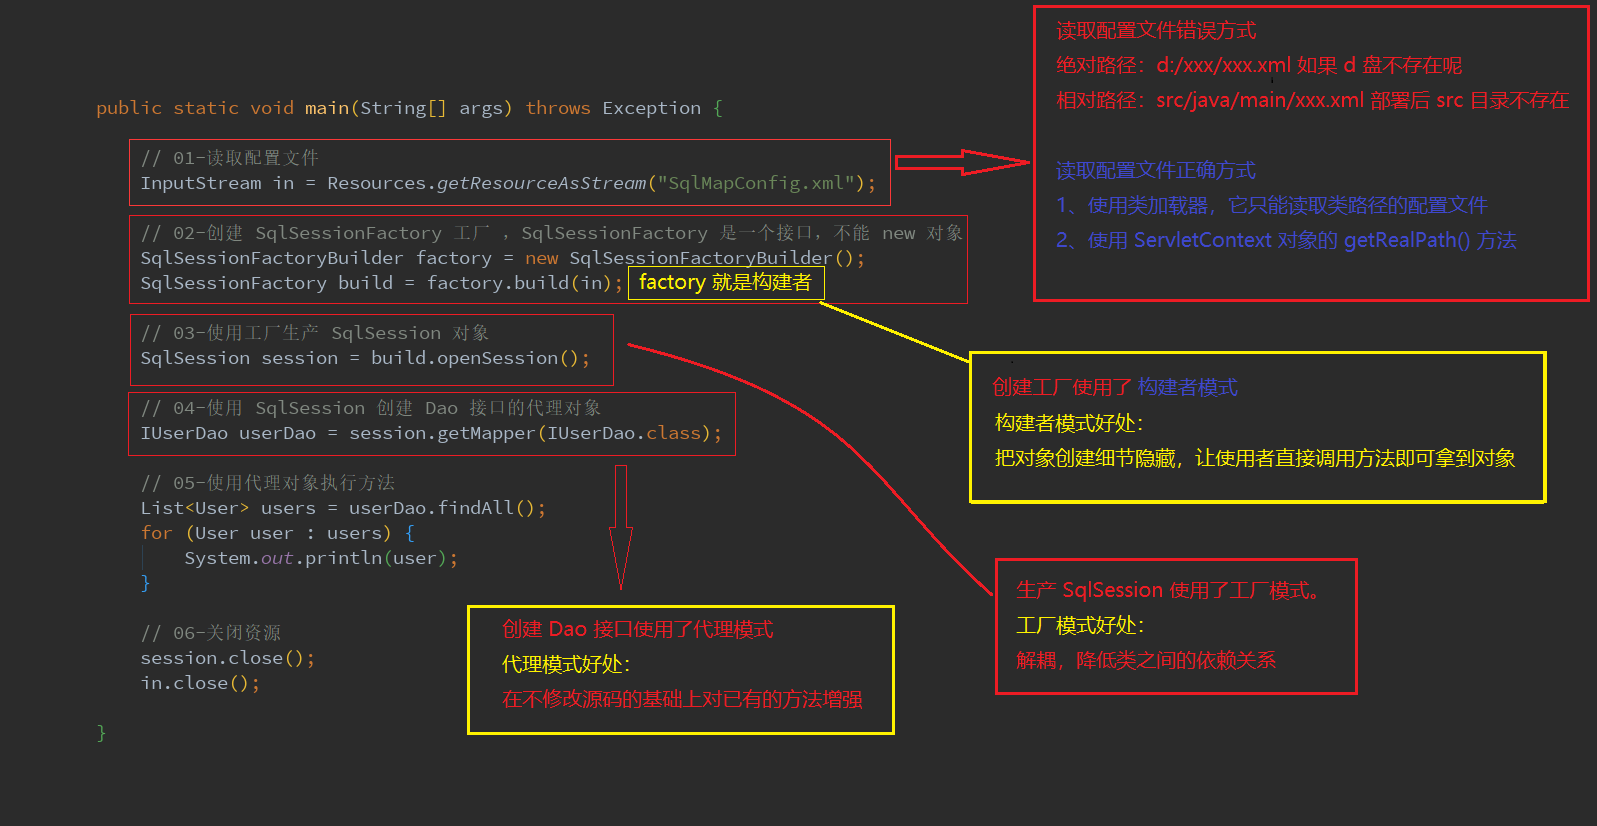
mybatis 入门案例到此结束,最终的目录结构和入门案例分析
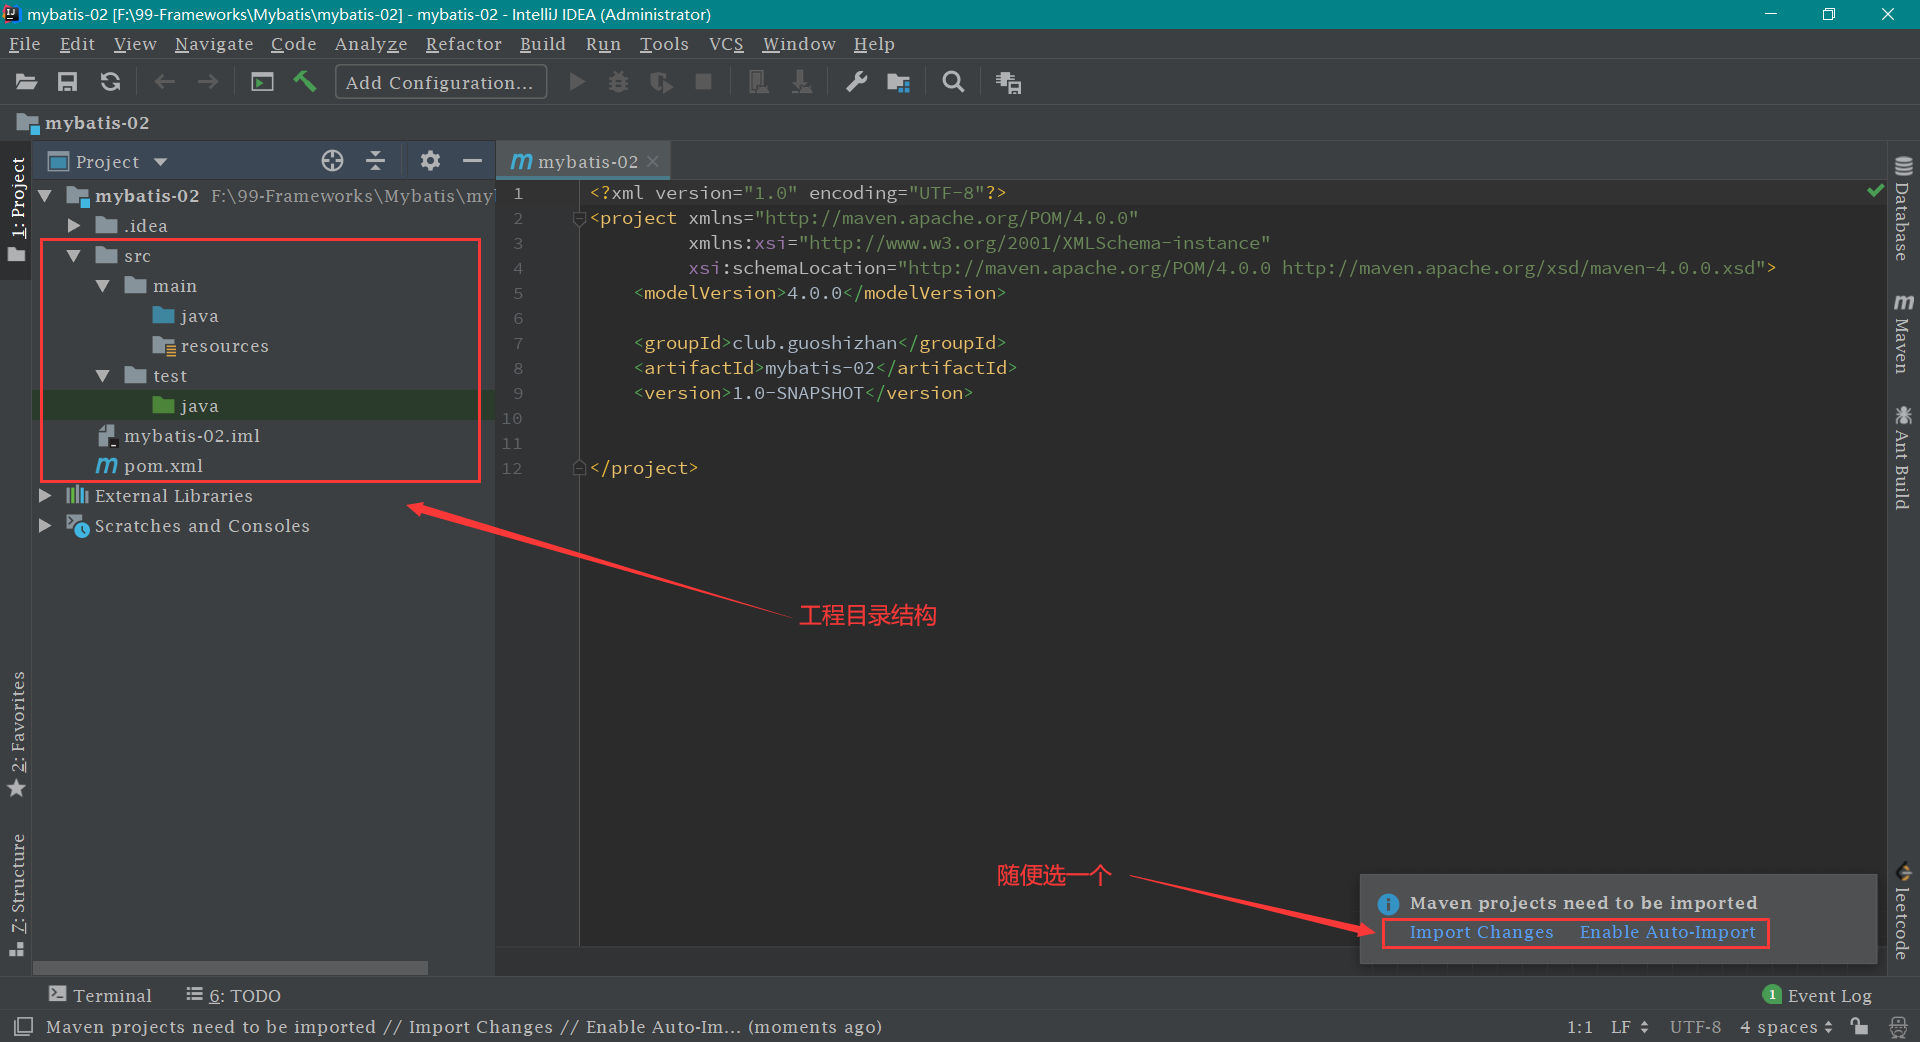
mybatis 注解案例 第一步: 创建一个 maven 工程
第二步: 导入相关依赖 pom.xml 文件,把以下 代码中的 <dependencies> 依赖部分 打包方式顺便加上
1 2 3 4 5 6 7 8 9 10 11 12 13 14 15 16 17 18 19 20 21 22 23 24 25 26 27 28 29 30 31 32 33 34 35 36 37 38 39 40 41 42 43 44 45 46 47 <?xml version="1.0" encoding="UTF-8"?> <project xmlns ="http://maven.apache.org/POM/4.0.0" xmlns:xsi ="http://www.w3.org/2001/XMLSchema-instance" xsi:schemaLocation ="http://maven.apache.org/POM/4.0.0 http://maven.apache.org/xsd/maven-4.0.0.xsd" > <modelVersion > 4.0.0</modelVersion > <groupId > club.guoshizhan</groupId > <artifactId > mybatis-02</artifactId > <version > 1.0-SNAPSHOT</version > <packaging > jar</packaging > <dependencies > <dependency > <groupId > org.mybatis</groupId > <artifactId > mybatis</artifactId > <version > 3.4.5</version > </dependency > <dependency > <groupId > mysql</groupId > <artifactId > mysql-connector-java</artifactId > <version > 5.1.6</version > <scope > runtime</scope > </dependency > <dependency > <groupId > log4j</groupId > <artifactId > log4j</artifactId > <version > 1.2.12</version > </dependency > <dependency > <groupId > junit</groupId > <artifactId > junit</artifactId > <version > 4.10</version > <scope > test</scope > </dependency > </dependencies > </project >
第三步: 建立包结构
第四步: 在 club/guoshizhan/domain 包下新建 User 类 ,和数据库中的 user 表 相映射。代码如下:
1 2 3 4 5 6 7 8 9 10 11 12 13 14 15 16 17 18 19 20 21 22 23 24 25 26 27 28 29 30 31 32 33 34 35 36 37 38 39 40 41 42 43 44 45 46 47 48 49 50 51 52 53 54 55 56 57 58 59 60 61 62 63 64 65 66 67 68 package club.guoshizhan.domain;import java.io.Serializable;import java.util.Date;public class User implements Serializable private Integer id; private String username; private Date birthday; private String sex; private String address; @Override public String toString () return "User{" + "id=" + id + ", username='" + username + '\'' + ", birthday=" + birthday + ", sex='" + sex + '\'' + ", address='" + address + '\'' + '}' ; } public Integer getId () return id; } public void setId (Integer id) this .id = id; } public String getUsername () return username; } public void setUsername (String username) this .username = username; } public Date getBirthday () return birthday; } public void setBirthday (Date birthday) this .birthday = birthday; } public String getSex () return sex; } public void setSex (String sex) this .sex = sex; } public String getAddress () return address; } public void setAddress (String address) this .address = address; } }
第五步: 在 club/guoshizhan/dao 包下新建 IUserDao 接口 ,然后定义方法,用于对 user 表 的增删改查 【此处代码可是用到了注解哦】
1 2 3 4 5 6 7 8 9 10 11 12 13 14 15 16 17 18 19 package club.guoshizhan.dao;import club.guoshizhan.domain.User;import org.apache.ibatis.annotations.Select;import java.util.List;public interface IUserDao @Select ("select * from user" ) List<User> findAll () ; }
第六步: 在 resources 目录 下新建 SqlMapConfig.xml 主配置文件,各种配置都写好了对应的注释【注意对比注释 06 和原先 xml 配置的区别】
1 2 3 4 5 6 7 8 9 10 11 12 13 14 15 16 17 18 19 20 21 22 23 24 25 26 27 28 29 30 31 32 33 34 35 36 37 38 39 40 <?xml version="1.0" encoding="UTF-8"?> <!DOCTYPE configuration PUBLIC "-//mybatis.org//DTD Config 3.0//EN" "http://mybatis.org/dtd/mybatis-3-config.dtd" > <configuration > <environments default ="mysql" > <environment id ="mysql" > <transactionManager type ="JDBC" > </transactionManager > <dataSource type ="POOLED" > <property name ="driver" value ="com.mysql.jdbc.Driver" /> <property name ="url" value ="jdbc:mysql://localhost:3306/eesy_mybatis" /> <property name ="username" value ="root" /> <property name ="password" value ="root" /> </dataSource > </environment > </environments > <mappers > <mapper class ="club.guoshizhan.dao.IUserDao" /> </mappers > </configuration >
第七步: 在 resources 目录下 新建 log4j.properties 日志文件
log4j.properties 1 2 3 4 5 6 7 8 9 10 11 12 13 14 15 16 17 18 log4j.rootCategory =debug, CONSOLE, LOGFILE log4j.logger.org.apache.axis.enterprise =FATAL, CONSOLE log4j.appender.CONSOLE =org.apache.log4j.ConsoleAppender log4j.appender.CONSOLE.layout =org.apache.log4j.PatternLayout log4j.appender.CONSOLE.layout.ConversionPattern =%d{ISO8601} %-6r [%15.15t] %-5p %30.30c %x - %m\n log4j.appender.LOGFILE =org.apache.log4j.FileAppender log4j.appender.LOGFILE.File =d:\axis.log log4j.appender.LOGFILE.Append =true log4j.appender.LOGFILE.layout =org.apache.log4j.PatternLayout log4j.appender.LOGFILE.layout.ConversionPattern =%d{ISO8601} %-6r [%15.15t] %-5p %30.30c %x - %m\n
第八步: 在 test/java 目录下 新建 club.guoshizhan.Test.MybatisTest 类,这样写的目的就是让 IDEA 自动生成三级包结构。然后编写 MybatisTest 类 ,代码如下:
MybatisTest.java 1 2 3 4 5 6 7 8 9 10 11 12 13 14 15 16 17 18 19 20 21 22 23 24 25 26 27 28 29 30 31 32 33 34 35 36 37 38 39 40 41 42 43 44 45 package club.guoshizhan.Test;import club.guoshizhan.dao.IUserDao;import club.guoshizhan.domain.User;import org.apache.ibatis.io.Resources;import org.apache.ibatis.session.SqlSession;import org.apache.ibatis.session.SqlSessionFactory;import org.apache.ibatis.session.SqlSessionFactoryBuilder;import java.io.InputStream;import java.util.List;public class MybatisTest public static void main (String[] args) throws Exception InputStream in = Resources.getResourceAsStream("SqlMapConfig.xml" ); SqlSessionFactoryBuilder factory = new SqlSessionFactoryBuilder(); SqlSessionFactory build = factory.build(in); SqlSession session = build.openSession(); IUserDao userDao = session.getMapper(IUserDao.class ) ; List<User> users = userDao.findAll(); for (User user : users) { System.out.println(user); } session.close(); in.close(); } }
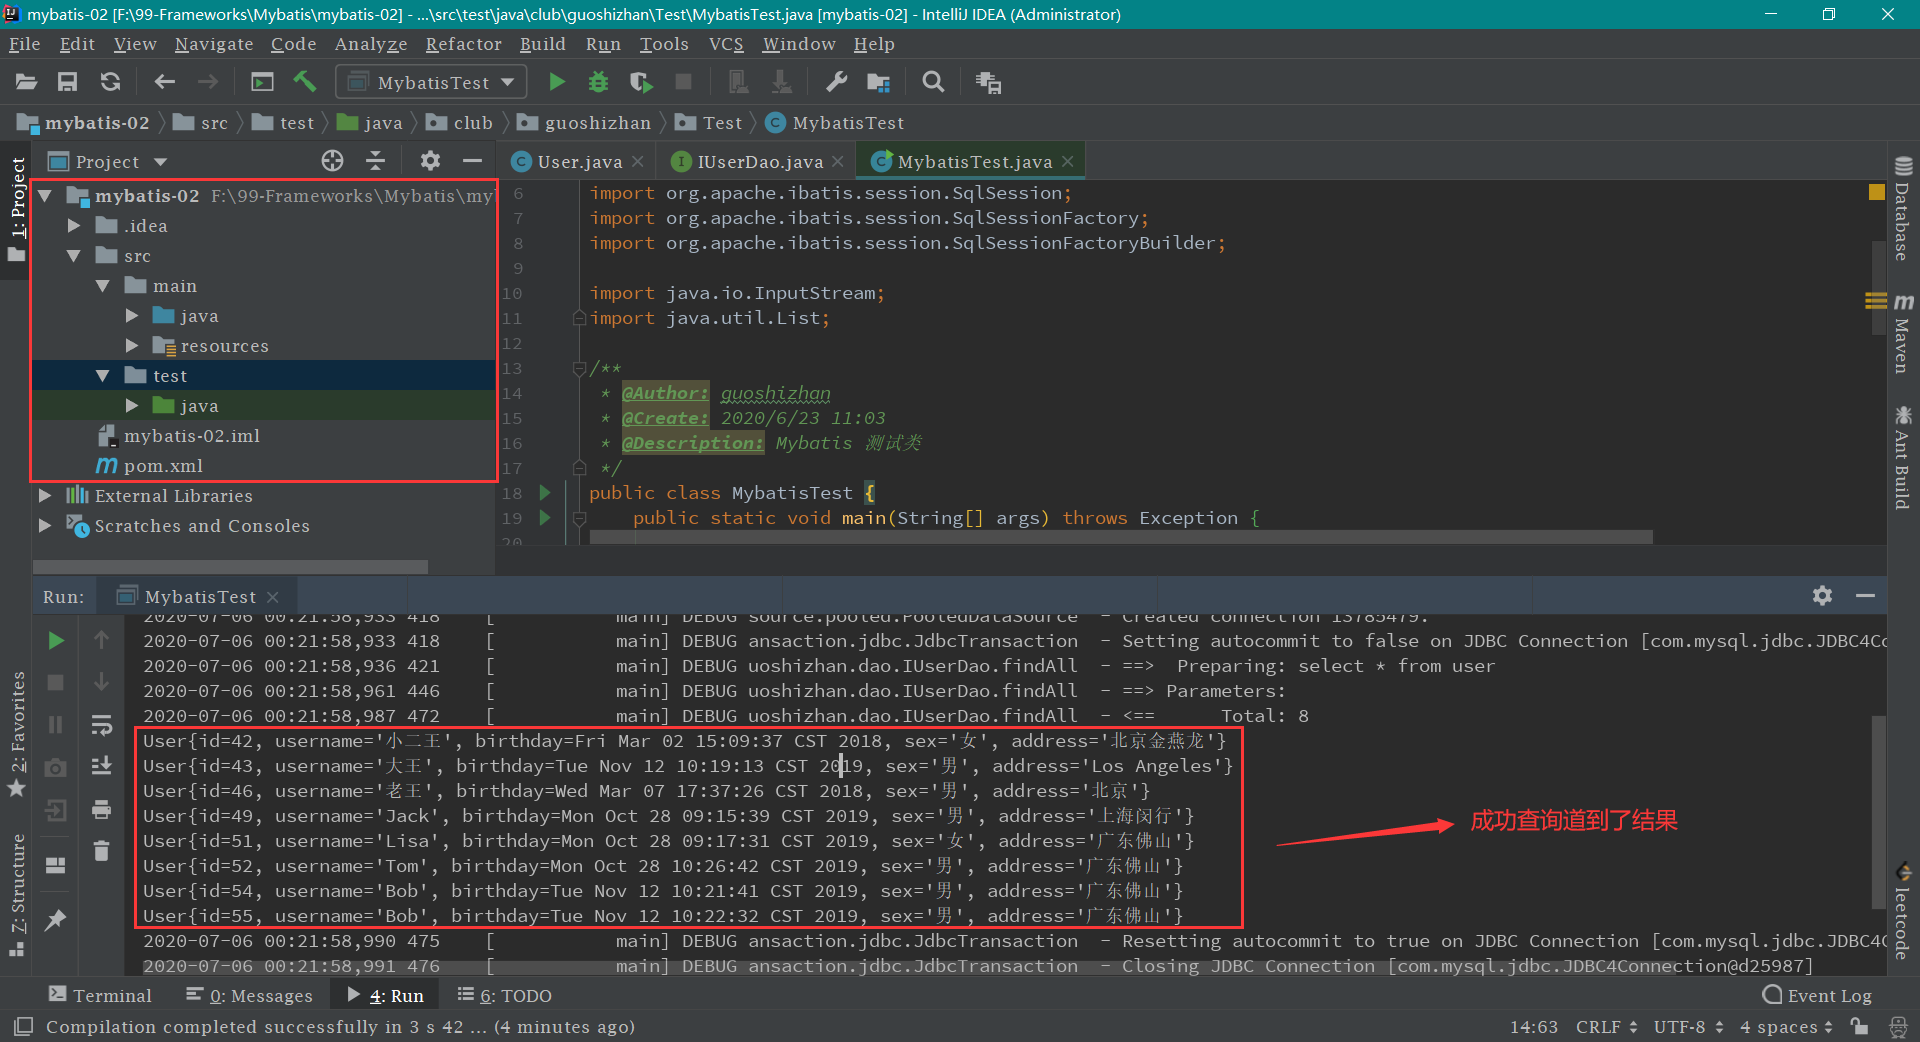
第九步: 运行 MybatisTest 测试类中的 main 方法,结果如下:
注解使用总结:
1、把 IUserDao.xml 移除,在 dao 接口中的方法上使用 @Select 注解,并且指定 SQL 语句。 2、同时需要在 SqlMapConfig.xml 中的 mapper 配置时,使用 class 属性指定 dao 接口的全限定类名。
自定义 mybatis 框架 第一步: 创建一个 Maven 工程。这里就不新创建了。具体创建可参考上一小节: mybatis 注解案例
第二步: 导入相关依赖 。打开 pom.xml 文件,复制如下代码:
1 2 3 4 5 6 7 8 9 10 11 12 13 14 15 16 17 18 19 20 21 22 23 24 25 26 27 28 29 30 31 32 33 34 35 36 37 38 39 40 41 42 43 44 45 46 47 48 49 50 51 52 53 54 55 56 57 58 59 60 61 <?xml version="1.0" encoding="UTF-8"?> <project xmlns ="http://maven.apache.org/POM/4.0.0" xmlns:xsi ="http://www.w3.org/2001/XMLSchema-instance" xsi:schemaLocation ="http://maven.apache.org/POM/4.0.0 http://maven.apache.org/xsd/maven-4.0.0.xsd" > <modelVersion > 4.0.0</modelVersion > <groupId > club.guoshizhan</groupId > <artifactId > mybatis-03</artifactId > <version > 1.0-SNAPSHOT</version > <packaging > jar</packaging > <dependencies > <dependency > <groupId > mysql</groupId > <artifactId > mysql-connector-java</artifactId > <version > 5.1.6</version > <scope > runtime</scope > </dependency > <dependency > <groupId > log4j</groupId > <artifactId > log4j</artifactId > <version > 1.2.12</version > </dependency > <dependency > <groupId > junit</groupId > <artifactId > junit</artifactId > <version > 4.10</version > <scope > test</scope > </dependency > <dependency > <groupId > dom4j</groupId > <artifactId > dom4j</artifactId > <version > 1.6.1</version > </dependency > <dependency > <groupId > jaxen</groupId > <artifactId > jaxen</artifactId > <version > 1.1.6</version > </dependency > </dependencies > </project >
第三步: 删除工程中的 src 目录 。 src 目录 src 目录文件的压缩包 复制完成之后的工程截图如下:
第四步: 在 guoshizhan 包 mybatis 包 ,然后在 mybatis Resources 类 。该类的代码如下:
Resources.java 1 2 3 4 5 6 7 8 9 10 11 12 13 14 15 16 17 package club.guoshizhan.mybatis;import java.io.InputStream;public class Resources public static InputStream getResourceAsStream (String filePath) return Resources.class .getClassLoader ().getResourceAsStream (filePath ) ; } }
接着在 mybatis 包 下新建 SqlSession 接口 ,该接口的代码如下:
SqlSession.java 1 2 3 4 5 6 7 8 9 10 11 12 13 14 15 16 package club.guoshizhan.mybatis;public interface SqlSession <T> T getMapper (Class<T> daoInterfaceClass) ; void close () }
然后在 mybatis 包 下新建 SqlSessionFactory 接口 ,该接口的代码如下:
SqlSessionFactory.java 1 2 3 4 5 6 7 8 9 10 11 12 13 package club.guoshizhan.mybatis;public interface SqlSessionFactory SqlSession openSession () ; }
最后在 mybatis 包 下新建 SqlSessionFactoryBuilder 类 ,该类初始代码如下【后面还需完善】:
SqlSessionFactoryBuilder.java 1 2 3 4 5 6 7 8 9 10 11 12 13 14 15 16 package club.guoshizhan.mybatis;import java.io.InputStream;public class SqlSessionFactoryBuilder public SqlSessionFactory build (InputStream config) return null ; } }
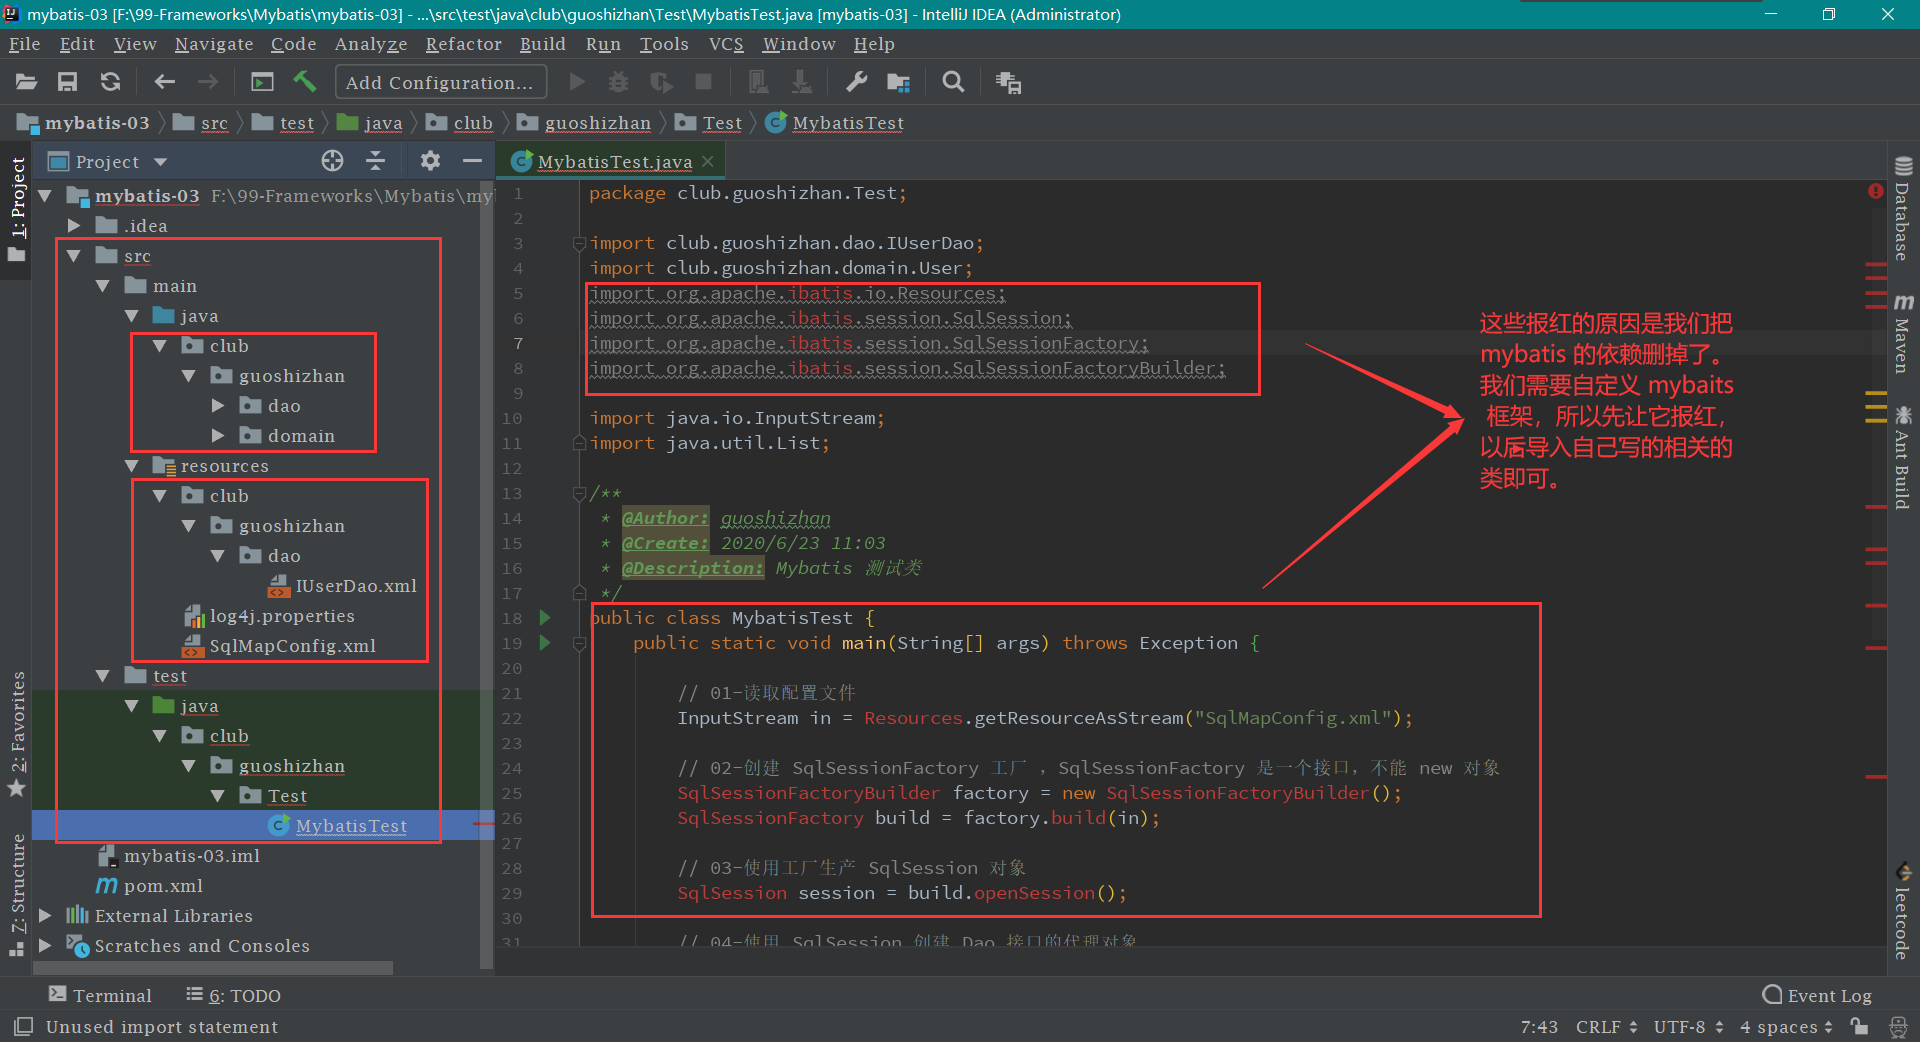
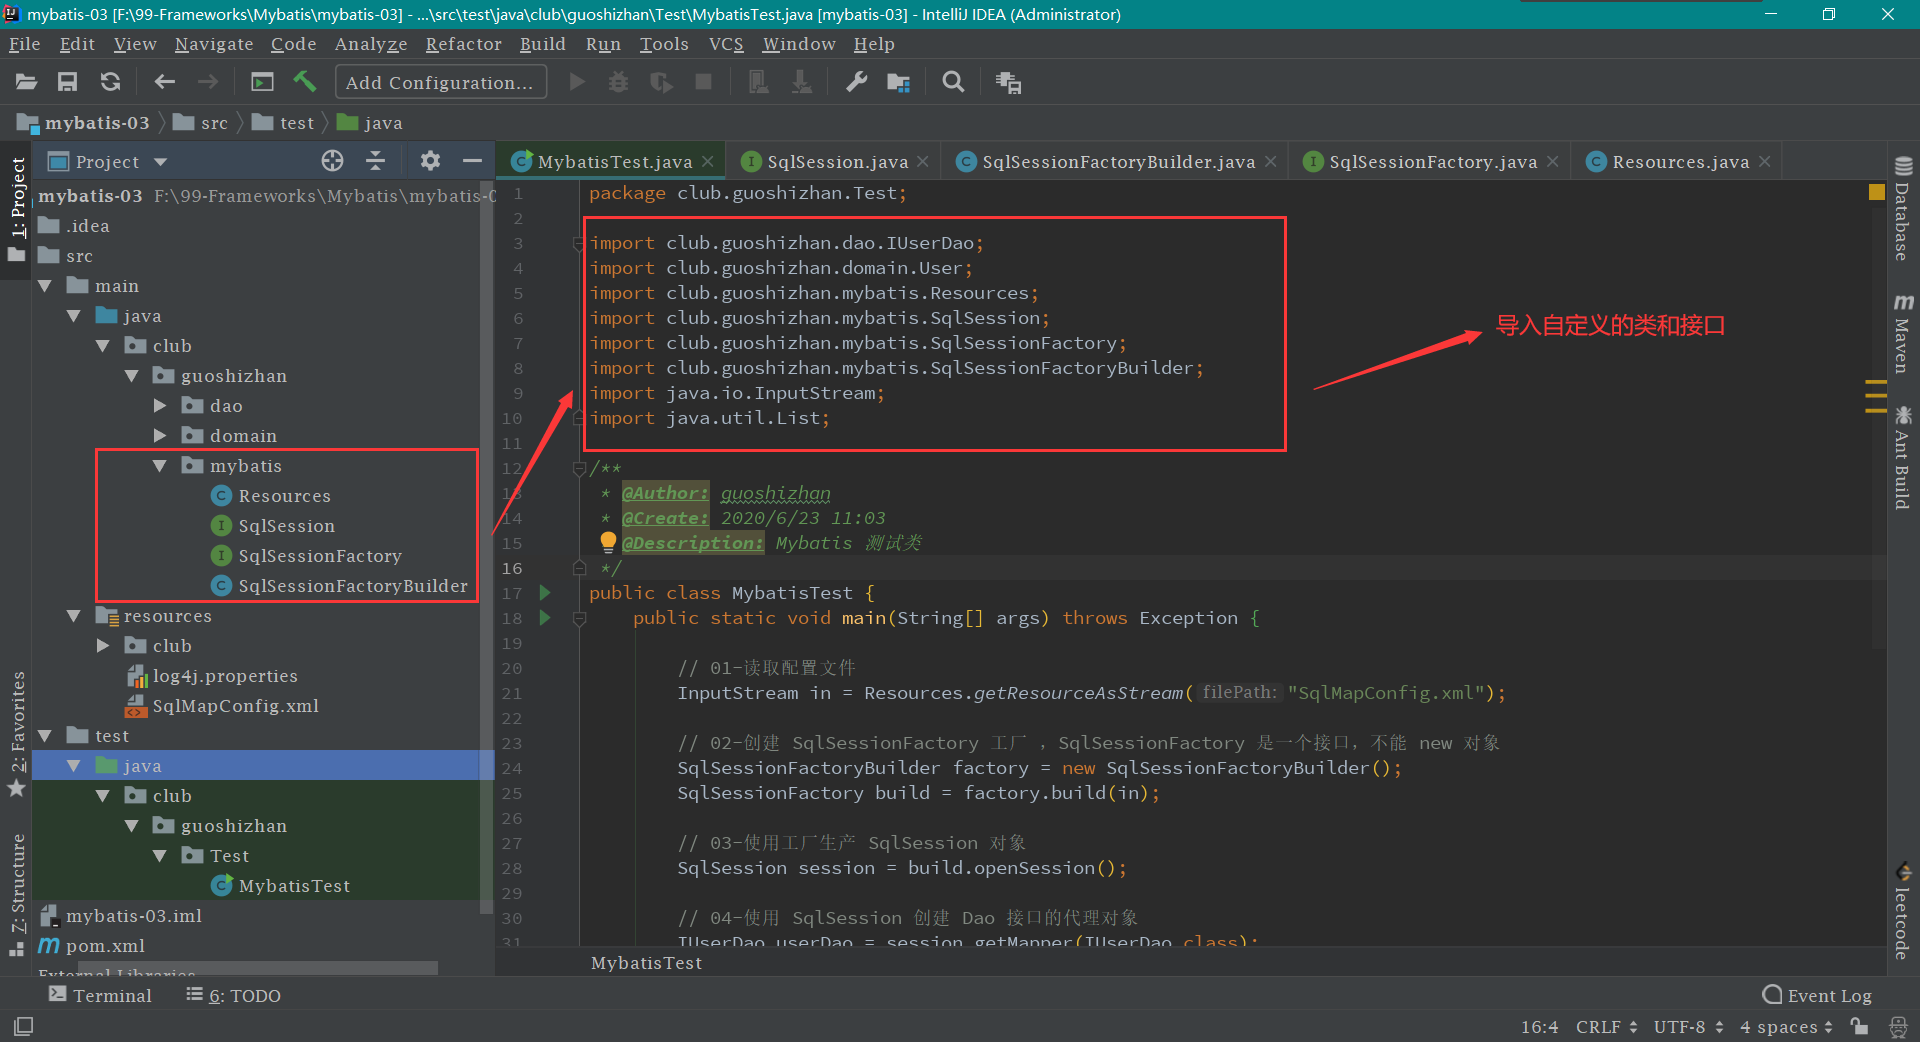
当类和接口创建好后,就去把 MybatisTest 测试类 中的报红问题解决。先删除无用的包,然后导入自定义的接口和类即可。最终 MybatisTest 测试类 代码和截图如下:
MybatisTest.java 1 2 3 4 5 6 7 8 9 10 11 12 13 14 15 16 17 18 19 20 21 22 23 24 25 26 27 28 29 30 31 32 33 34 35 36 37 38 39 40 41 42 43 44 package club.guoshizhan.Test;import club.guoshizhan.dao.IUserDao;import club.guoshizhan.domain.User;import club.guoshizhan.mybatis.Resources;import club.guoshizhan.mybatis.SqlSession;import club.guoshizhan.mybatis.SqlSessionFactory;import club.guoshizhan.mybatis.SqlSessionFactoryBuilder;import java.io.InputStream;import java.util.List;public class MybatisTest public static void main (String[] args) throws Exception InputStream in = Resources.getResourceAsStream("SqlMapConfig.xml" ); SqlSessionFactoryBuilder factory = new SqlSessionFactoryBuilder(); SqlSessionFactory build = factory.build(in); SqlSession session = build.openSession(); IUserDao userDao = session.getMapper(IUserDao.class ) ; List<User> users = userDao.findAll(); for (User user : users) { System.out.println(user); } session.close(); in.close(); } }
第五步: 解析 XML 配置文件 mybatis 包 下新建 Configuration 配置类 ,该类的代码如下:
Configuration.java 1 2 3 4 5 6 7 8 9 10 11 12 13 14 15 16 17 18 19 20 21 22 23 24 25 26 27 28 29 30 31 32 33 34 35 36 37 38 39 40 41 42 43 44 45 46 47 48 49 50 51 52 53 54 55 56 57 58 59 package club.guoshizhan.mybatis;import java.util.HashMap;import java.util.Map;public class Configuration private String driver; private String url; private String username; private String password; private Map<String, Mapper> mappers = new HashMap<>(); public Map<String, Mapper> getMappers () return mappers; } public void setMappers (Map<String, Mapper> mappers) this .mappers.putAll(mappers); } public String getDriver () return driver; } public void setDriver (String driver) this .driver = driver; } public String getUrl () return url; } public void setUrl (String url) this .url = url; } public String getUsername () return username; } public void setUsername (String username) this .username = username; } public String getPassword () return password; } public void setPassword (String password) this .password = password; } }
然后在 mybatis 包 下新建 Mapper 类 ,该类的代码如下:
Mapper.java 1 2 3 4 5 6 7 8 9 10 11 12 13 14 15 16 17 18 19 20 21 22 23 24 25 26 27 28 29 package club.guoshizhan.mybatis;public class Mapper private String queryString; private String resultType; public String getQueryString () return queryString; } public void setQueryString (String queryString) this .queryString = queryString; } public String getResultType () return resultType; } public void setResultType (String resultType) this .resultType = resultType; } }
最后在 mybatis 包 下新建 XMLConfigBuilder 类 用于解析 xml 文件
XMLConfigBuilder.java 1 2 3 4 5 6 7 8 9 10 11 12 13 14 15 16 17 18 19 20 21 22 23 24 25 26 27 28 29 30 31 32 33 34 35 36 37 38 39 40 41 42 43 44 45 46 47 48 49 50 51 52 53 54 55 56 57 58 59 60 61 62 63 64 65 66 67 68 69 70 71 72 73 74 75 76 77 78 79 80 81 82 83 84 85 86 87 88 89 90 91 92 93 94 95 96 97 98 99 100 101 102 103 104 105 106 107 108 109 110 111 112 113 114 115 116 117 118 119 120 121 122 123 124 125 126 127 128 129 130 131 132 133 134 135 136 137 138 139 140 141 142 143 144 145 146 147 148 149 150 151 152 153 154 155 156 157 158 159 160 161 162 163 164 165 166 167 168 169 170 171 172 173 174 175 176 177 178 179 180 181 182 183 184 185 186 187 188 189 190 191 192 193 194 195 196 197 198 199 200 201 202 package club.guoshizhan.mybatis;import org.dom4j.Attribute;import org.dom4j.Document;import org.dom4j.Element;import org.dom4j.io.SAXReader;import java.io.IOException;import java.io.InputStream;import java.util.HashMap;import java.util.List;import java.util.Map;public class XMLConfigBuilder public static Configuration loadConfiguration (InputStream config) try { Configuration cfg = new Configuration(); SAXReader reader = new SAXReader(); Document document = reader.read(config); Element root = document.getRootElement(); List<Element> propertyElements = root.selectNodes("//property" ); for (Element propertyElement : propertyElements) { String name = propertyElement.attributeValue("name" ); if ("driver" .equals(name)) { String driver = propertyElement.attributeValue("value" ); cfg.setDriver(driver); } if ("url" .equals(name)) { String url = propertyElement.attributeValue("value" ); cfg.setUrl(url); } if ("username" .equals(name)) { String username = propertyElement.attributeValue("value" ); cfg.setUsername(username); } if ("password" .equals(name)) { String password = propertyElement.attributeValue("value" ); cfg.setPassword(password); } } List<Element> mapperElements = root.selectNodes("//mappers/mapper" ); for (Element mapperElement : mapperElements) { Attribute attribute = mapperElement.attribute("resource" ); if (attribute != null ) { System.out.println("使用的是 XML " ); String mapperPath = attribute.getValue(); Map<String, Mapper> mappers = loadMapperConfiguration(mapperPath); cfg.setMappers(mappers); } else { } } return cfg; } catch (Exception e) { throw new RuntimeException(e); } finally { try { config.close(); } catch (Exception e) { e.printStackTrace(); } } } private static Map<String, Mapper> loadMapperConfiguration (String mapperPath) throws IOException InputStream in = null ; try { Map<String, Mapper> mappers = new HashMap<String, Mapper>(); in = Resources.getResourceAsStream(mapperPath); SAXReader reader = new SAXReader(); Document document = reader.read(in); Element root = document.getRootElement(); String namespace = root.attributeValue("namespace" ); List<Element> selectElements = root.selectNodes("//select" ); for (Element selectElement : selectElements) { String id = selectElement.attributeValue("id" ); String resultType = selectElement.attributeValue("resultType" ); String queryString = selectElement.getText(); String key = namespace + "." + id; Mapper mapper = new Mapper(); mapper.setQueryString(queryString); mapper.setResultType(resultType); mappers.put(key, mapper); } return mappers; } catch (Exception e) { throw new RuntimeException(e); } finally { in.close(); } } }
第六步: 编写工具类和代理类 mybatis 包 下新建 DataSourceUtil 类 ,该类的代码如下:
DataSourceUtil.java 1 2 3 4 5 6 7 8 9 10 11 12 13 14 15 16 17 18 19 20 21 22 23 package club.guoshizhan.mybatis;import java.sql.Connection;import java.sql.DriverManager;public class DataSourceUtil public static Connection getConnection (Configuration cfg) try { Class.forName(cfg.getDriver()); return DriverManager.getConnection(cfg.getUrl(), cfg.getUsername(), cfg.getPassword()); } catch (Exception e) { throw new RuntimeException(e); } } }
接着在 mybatis 包 下新建 Executor 类 ,该类的代码如下:
Executor.java 1 2 3 4 5 6 7 8 9 10 11 12 13 14 15 16 17 18 19 20 21 22 23 24 25 26 27 28 29 30 31 32 33 34 35 36 37 38 39 40 41 42 43 44 45 46 47 48 49 50 51 52 53 54 55 56 57 58 59 60 61 62 63 64 65 66 67 68 69 70 71 72 73 74 75 76 77 78 package club.guoshizhan.mybatis;import java.beans.PropertyDescriptor;import java.lang.reflect.Method;import java.sql.Connection;import java.sql.PreparedStatement;import java.sql.ResultSet;import java.sql.ResultSetMetaData;import java.util.ArrayList;import java.util.List;public class Executor public <E> List<E> selectList (Mapper mapper, Connection conn) { PreparedStatement pstm = null ; ResultSet rs = null ; try { String queryString = mapper.getQueryString(); String resultType = mapper.getResultType(); Class domainClass = Class.forName(resultType); pstm = conn.prepareStatement(queryString); rs = pstm.executeQuery(); List<E> list = new ArrayList<>(); while (rs.next()) { E obj = (E) domainClass.newInstance(); ResultSetMetaData rsmd = rs.getMetaData(); int columnCount = rsmd.getColumnCount(); for (int i = 1 ; i <= columnCount; i++) { String columnName = rsmd.getColumnName(i); Object columnValue = rs.getObject(columnName); PropertyDescriptor pd = new PropertyDescriptor(columnName, domainClass); Method writeMethod = pd.getWriteMethod(); writeMethod.invoke(obj, columnValue); } list.add(obj); } return list; } catch (Exception e) { throw new RuntimeException(e); } finally { release(pstm, rs); } } private void release (PreparedStatement pstm, ResultSet rs) if (rs != null ) { try { rs.close(); } catch (Exception e) { e.printStackTrace(); } } if (pstm != null ) { try { pstm.close(); } catch (Exception e) { e.printStackTrace(); } } } }
最后在 mybatis 包 下新建 MapperProxy 类 ,该类的代码如下:
MapperProxy.java 1 2 3 4 5 6 7 8 9 10 11 12 13 14 15 16 17 18 19 20 21 22 23 24 25 26 27 28 29 30 31 32 33 34 35 36 37 38 39 40 41 42 43 44 45 46 47 48 package club.guoshizhan.mybatis;import java.lang.reflect.InvocationHandler;import java.lang.reflect.Method;import java.sql.Connection;import java.util.Map;public class MapperProxy implements InvocationHandler private Map<String, Mapper> mappers; private Connection connection; public MapperProxy (Map<String, Mapper> mappers, Connection connection) this .mappers = mappers; this .connection = connection; } @Override public Object invoke (Object proxy, Method method, Object[] args) throws Throwable String methodName = method.getName(); String className = method.getDeclaringClass().getName(); String key = className + "." + methodName; Mapper mapper = mappers.get(key); if (mapper == null ) { throw new IllegalArgumentException("The args is wrong!!!" ); } return new Executor().selectList(mapper, connection); } }
第七步: 编写实现类 mybatis 包 下新建 DefaultSqlSession 类 来实现 SqlSession 接口
DefaultSqlSession.java 1 2 3 4 5 6 7 8 9 10 11 12 13 14 15 16 17 18 19 20 21 22 23 24 25 26 27 28 29 30 31 32 33 34 35 36 37 38 39 package club.guoshizhan.mybatis;import java.lang.reflect.Proxy;import java.sql.Connection;public class DefaultSqlSession implements SqlSession private Configuration cfg; private Connection conn; public DefaultSqlSession (Configuration cfg) this .cfg = cfg; conn = DataSourceUtil.getConnection(cfg); } @Override public <T> T getMapper (Class<T> daoInterfaceClass) { return (T) Proxy.newProxyInstance(daoInterfaceClass.getClassLoader(), new Class[]{daoInterfaceClass}, new MapperProxy(cfg.getMappers(), conn)); } @Override public void close () if (conn != null ) { try { conn.close(); } catch (Exception e) { e.printStackTrace(); } } } }
接着在 mybatis 包 下新建 DefaultSqlSessionFactory 类 来实现 SqlSessionFactory 接口
DefaultSqlSessionFactory.java 1 2 3 4 5 6 7 8 9 10 11 12 13 14 15 16 17 18 19 20 21 22 package club.guoshizhan.mybatis;public class DefaultSqlSessionFactory implements SqlSessionFactory private Configuration cfg; public DefaultSqlSessionFactory (Configuration cfg) this .cfg = cfg; } @Override public SqlSession openSession () return new DefaultSqlSession(cfg); } }
最后继续编写 mybatis 包 下的 SqlSessionFactoryBuilder 类 【原先没有写完】,该类的代码如下:
1 2 3 4 5 6 7 8 9 10 11 12 13 14 15 16 17 18 package club.guoshizhan.mybatis;import java.io.InputStream;public class SqlSessionFactoryBuilder public SqlSessionFactory build (InputStream config) Configuration cfg = XMLConfigBuilder.loadConfiguration(config); return new DefaultSqlSessionFactory(cfg); } }
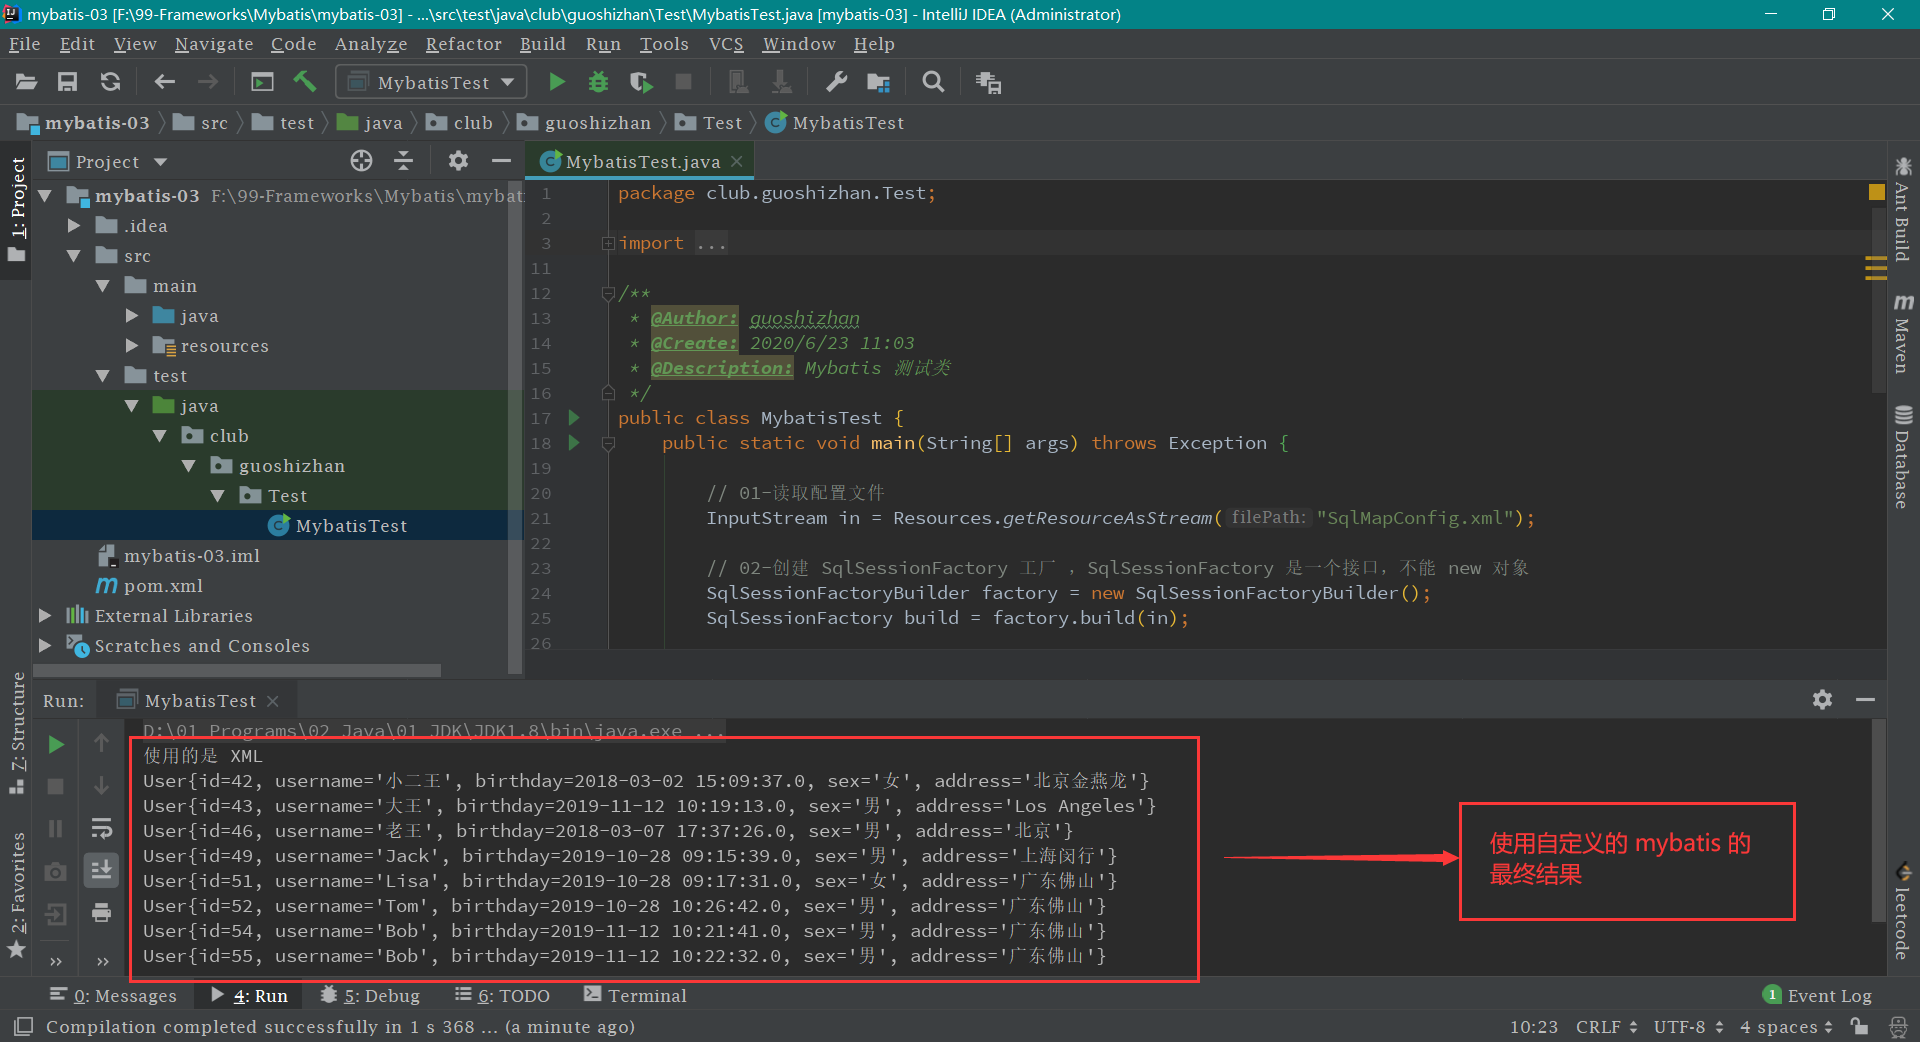
最后一步: 运行 MybatisTest 测试类中的 main 方法
附加功能: 自定义 mybatis 并支持注解 第一步: 修改 IUserDao 接口【就是加一个 Select 注解】
IUserDao.java 1 2 3 4 5 6 7 8 9 10 11 12 13 14 15 16 17 18 19 package club.guoshizhan.dao;import club.guoshizhan.domain.User;import club.guoshizhan.mybatis.Select;import java.util.List;public interface IUserDao @Select ("select * from user" ) List<User> findAll () ; }
第二步: 修改 SqlMapConfig.xml 配置文件中的 mapper 属性,将其改为 class
SqlMapConfig.xml 1 2 3 4 <mappers > <mapper class ="club.guoshizhan.dao.IUserDao" /> </mappers >
第三步: 新建 Select 注解类 mybatis 包 下新建 Select 注解 。代码如下:
Select.java 1 2 3 4 5 6 7 8 9 10 11 12 13 14 15 16 17 18 19 20 package club.guoshizhan.mybatis;import java.lang.annotation.ElementType;import java.lang.annotation.Retention;import java.lang.annotation.RetentionPolicy;import java.lang.annotation.Target;@Retention (RetentionPolicy.RUNTIME)@Target (ElementType.METHOD)public @interface Select { String value () ; }
第四步: 修改 XMLConfigBuilder 类 即把原先注释的部分放开【原先注解部分被注释掉了】
XMLConfigBuilder.java 1 2 3 4 5 6 7 8 9 10 11 12 13 14 15 16 17 18 19 20 21 22 23 24 25 26 27 28 29 30 31 32 33 34 35 36 37 38 39 40 41 42 43 44 45 46 47 48 49 50 51 52 53 54 55 56 57 58 59 60 61 62 63 64 65 66 67 68 69 70 71 72 73 74 75 76 77 78 79 80 81 82 83 84 85 86 87 88 89 90 91 92 93 94 95 96 97 98 99 100 101 102 103 104 105 106 107 108 109 110 111 112 113 114 115 116 117 118 119 120 121 122 123 124 125 126 127 128 129 130 131 132 133 134 135 136 137 138 139 140 141 142 143 144 145 146 147 148 149 150 151 152 153 154 155 156 157 158 159 160 161 162 163 164 165 166 167 168 169 170 171 172 173 174 175 176 177 178 179 180 181 182 183 184 185 186 187 188 189 190 191 192 193 194 195 196 197 198 199 200 201 202 203 204 205 package club.guoshizhan.mybatis;import org.dom4j.Attribute;import org.dom4j.Document;import org.dom4j.Element;import org.dom4j.io.SAXReader;import java.io.IOException;import java.io.InputStream;import java.lang.reflect.Method;import java.lang.reflect.ParameterizedType;import java.lang.reflect.Type;import java.util.HashMap;import java.util.List;import java.util.Map;public class XMLConfigBuilder public static Configuration loadConfiguration (InputStream config) try { Configuration cfg = new Configuration(); SAXReader reader = new SAXReader(); Document document = reader.read(config); Element root = document.getRootElement(); List<Element> propertyElements = root.selectNodes("//property" ); for (Element propertyElement : propertyElements) { String name = propertyElement.attributeValue("name" ); if ("driver" .equals(name)) { String driver = propertyElement.attributeValue("value" ); cfg.setDriver(driver); } if ("url" .equals(name)) { String url = propertyElement.attributeValue("value" ); cfg.setUrl(url); } if ("username" .equals(name)) { String username = propertyElement.attributeValue("value" ); cfg.setUsername(username); } if ("password" .equals(name)) { String password = propertyElement.attributeValue("value" ); cfg.setPassword(password); } } List<Element> mapperElements = root.selectNodes("//mappers/mapper" ); for (Element mapperElement : mapperElements) { Attribute attribute = mapperElement.attribute("resource" ); if (attribute != null ) { System.out.println("使用的是 XML " ); String mapperPath = attribute.getValue(); Map<String, Mapper> mappers = loadMapperConfiguration(mapperPath); cfg.setMappers(mappers); } else { System.out.println("使用的是注解" ); String daoClassPath = mapperElement.attributeValue("class" ); Map<String, Mapper> mappers = loadMapperAnnotation(daoClassPath); cfg.setMappers(mappers); } } return cfg; } catch (Exception e) { throw new RuntimeException(e); } finally { try { config.close(); } catch (Exception e) { e.printStackTrace(); } } } private static Map<String, Mapper> loadMapperConfiguration (String mapperPath) throws IOException InputStream in = null ; try { Map<String, Mapper> mappers = new HashMap<String, Mapper>(); in = Resources.getResourceAsStream(mapperPath); SAXReader reader = new SAXReader(); Document document = reader.read(in); Element root = document.getRootElement(); String namespace = root.attributeValue("namespace" ); List<Element> selectElements = root.selectNodes("//select" ); for (Element selectElement : selectElements) { String id = selectElement.attributeValue("id" ); String resultType = selectElement.attributeValue("resultType" ); String queryString = selectElement.getText(); String key = namespace + "." + id; Mapper mapper = new Mapper(); mapper.setQueryString(queryString); mapper.setResultType(resultType); mappers.put(key, mapper); } return mappers; } catch (Exception e) { throw new RuntimeException(e); } finally { in.close(); } } private static Map<String, Mapper> loadMapperAnnotation (String daoClassPath) throws Exception Map<String, Mapper> mappers = new HashMap<String, Mapper>(); Class daoClass = Class.forName(daoClassPath); Method[] methods = daoClass.getMethods(); for (Method method : methods) { boolean isAnnotated = method.isAnnotationPresent(Select.class ) ; if (isAnnotated) { Mapper mapper = new Mapper(); Select selectAnno = method.getAnnotation(Select.class ) ; String queryString = selectAnno.value(); mapper.setQueryString(queryString); Type type = method.getGenericReturnType(); if (type instanceof ParameterizedType) { ParameterizedType ptype = (ParameterizedType) type; Type[] types = ptype.getActualTypeArguments(); Class domainClass = (Class) types[0 ]; String resultType = domainClass.getName(); mapper.setResultType(resultType); } String methodName = method.getName(); String className = method.getDeclaringClass().getName(); String key = className + "." + methodName; mappers.put(key, mapper); } } return mappers; } }
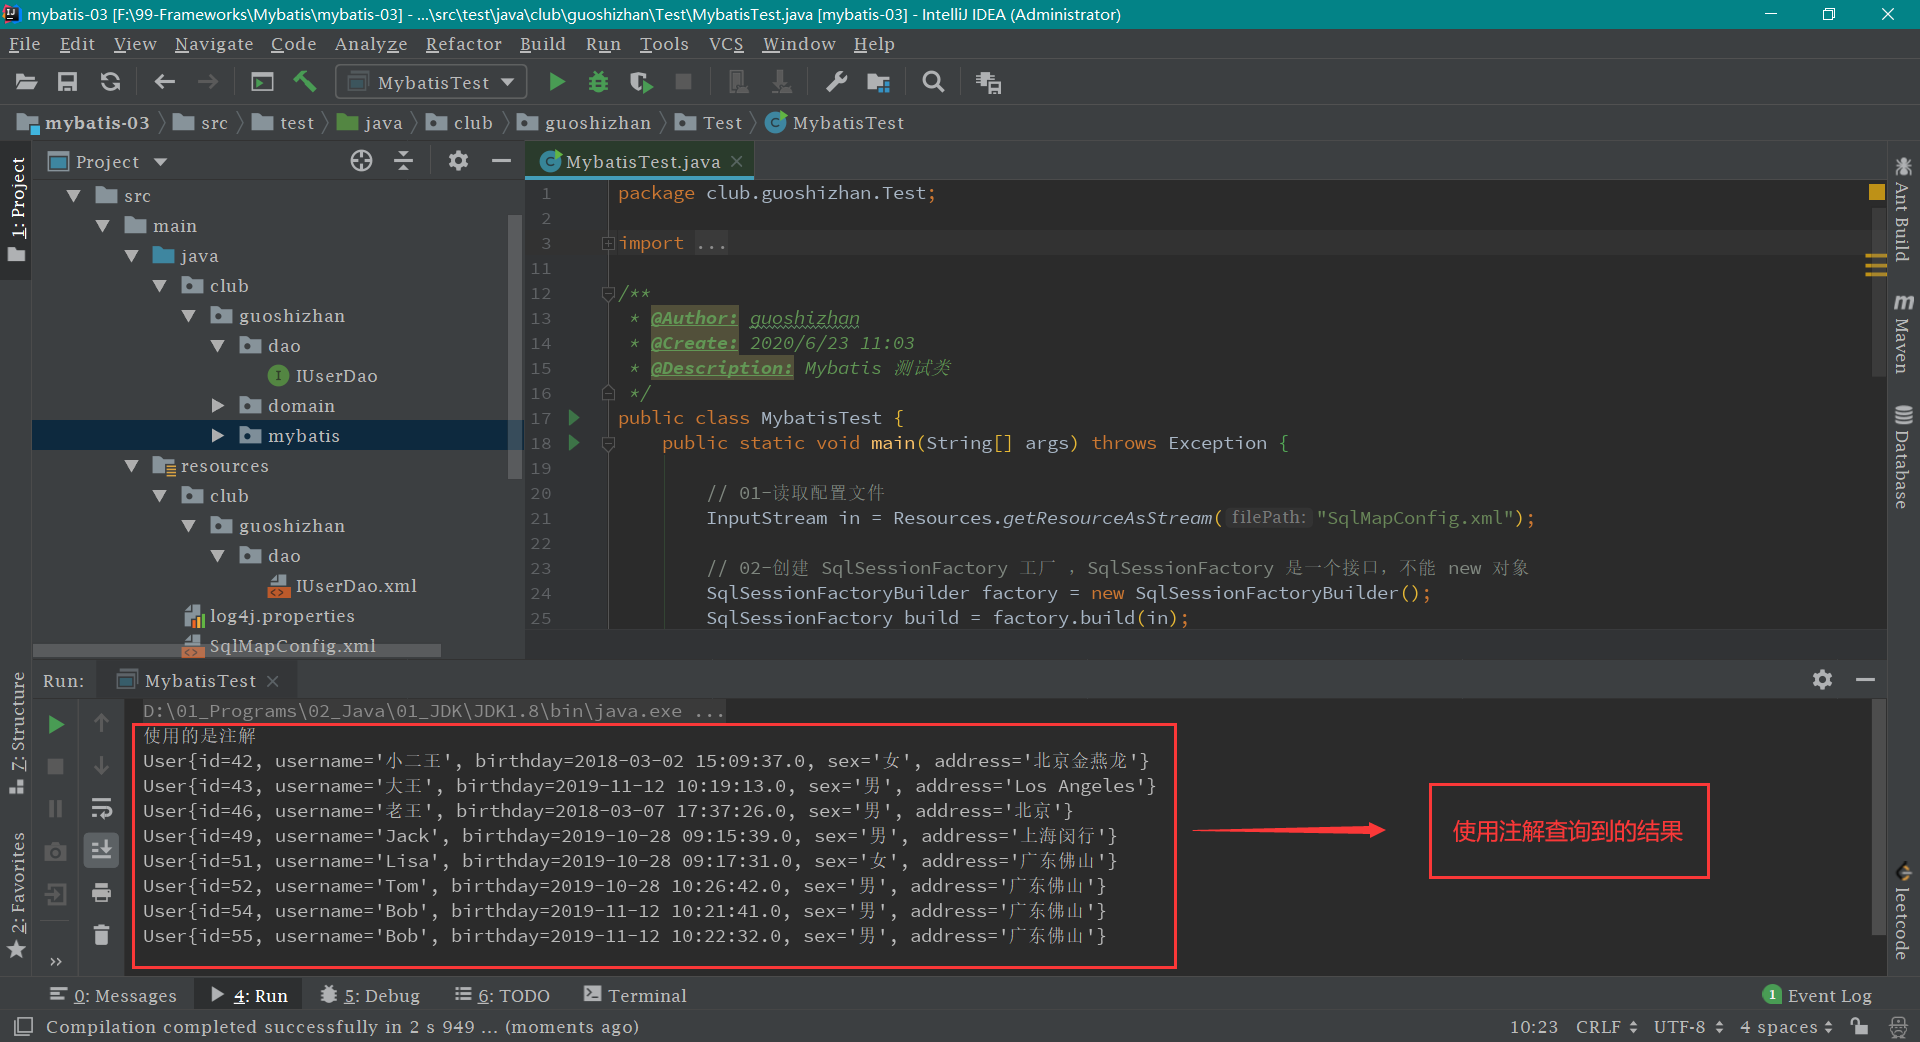
最后一步: 运行 MybatisTest 测试类中的 main 方法
mybatis 的基本使用 mybatis 的单表操作 mybatis 的参数和返回值 mybatis 的基本配置 mybatis 的 CRUD